Author

Tom

Browsing

Welcome to the Heart of Comfort Food

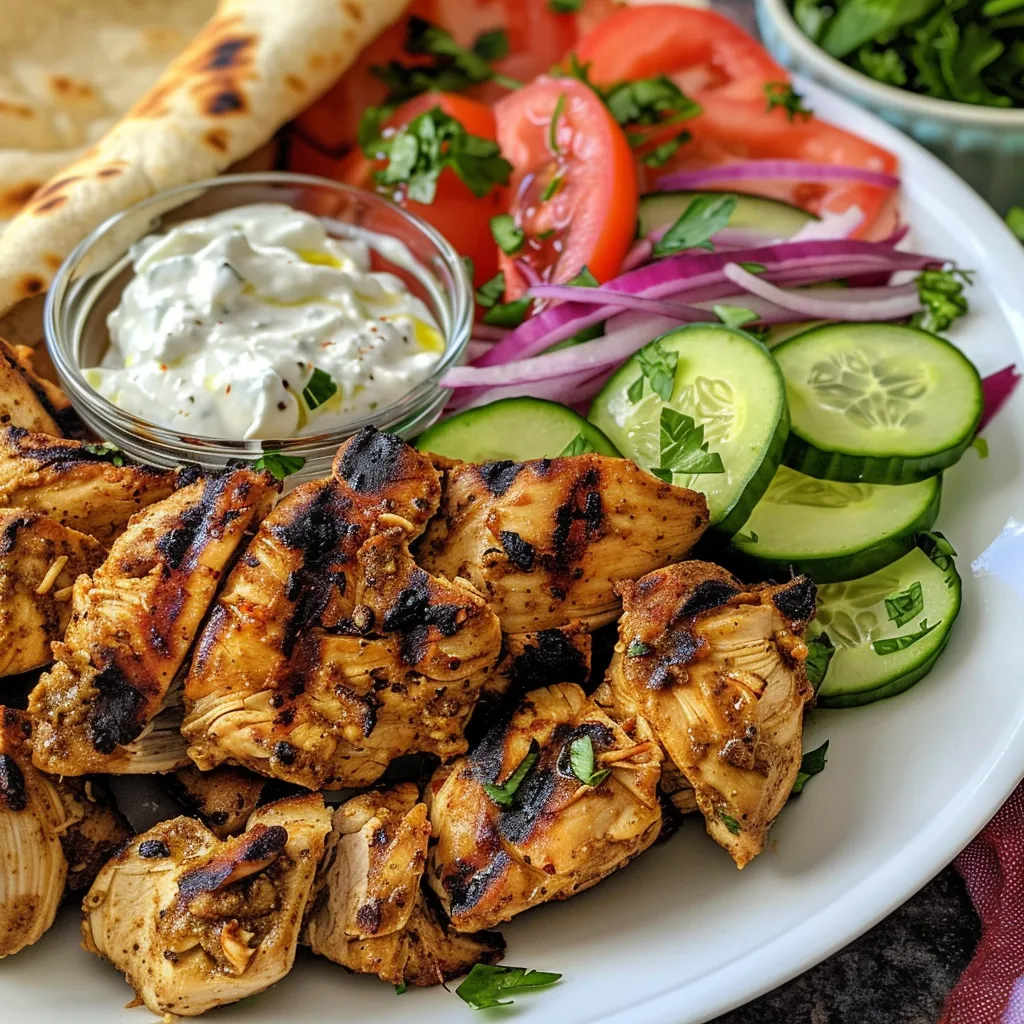
Cooking is more than just a task; it’s an art form that weaves together the stories of our lives. Today, I’m excited to share a dish that embodies warmth and nostalgia: Oven-Baked Honey Mustard Chicken with Herb Crust. This recipe is not just about cooking chicken; it’s about creating memories around the dinner table, where laughter and love come together. Let’s dive into this delightful dish that will make your weeknight meals brighter!

Why You’ll Love This Recipe

This oven-baked honey mustard chicken is a true crowd-pleaser. Here are five reasons why you’ll want to keep this recipe close at hand:

  • Easy Preparation: With simple ingredients and straightforward steps, this dish fits perfectly into your busy schedule.
  • Flavor Explosion: The combination of sweet honey and tangy mustard creates a mouthwatering glaze that elevates the chicken to new heights.
  • Healthy and Wholesome: Using skinless, boneless chicken breasts makes this dish a lean protein option that doesn’t skimp on flavor.
  • Perfect for Any Occasion: Whether it’s a casual family dinner or a special gathering, this dish is versatile enough to impress.
  • Leftover Friendly: Enjoy the deliciousness the next day! This chicken tastes even better when the flavors have time to meld.

Gathering Your Flavor Arsenal

Let’s talk ingredients. This recipe calls for simple, everyday items you may already have in your pantry. Here’s what you’ll need:

  • Nonstick cooking spray: A quick spritz keeps things from sticking—no one likes a messy cleanup!
  • 12 skinless, boneless chicken breast halves: The lean star of our show. If you prefer dark meat, feel free to swap in chicken thighs for extra juiciness.
  • Salt and black pepper, to taste: Essential for seasoning. Don’t hold back; a well-seasoned chicken is a happy chicken.
  • 1 cup honey: The sweet counterpart to our mustard. Choose high-quality honey for the best flavor.
  • 1 cup prepared mustard: This is where the magic happens—opt for Dijon for a sharp kick.
  • 2 tsp dried basil: Adds a lovely herbal note that complements the other flavors beautifully.
  • 1 tsp dried parsley: A subtle herb that rounds out the dish.
  • 2 tsp paprika: For a touch of smokiness that enhances the overall flavor.
  • 1 tsp garlic powder: Because garlic makes everything better.
  • Zest of 1 lemon: A bright burst of freshness that cuts through the richness.
  • Optional: ½ tsp crushed red pepper flakes: For those who like a little heat!

Step-by-Step Guide to Flavor Town

Side view of succulent honey mustard chicken, glistening with a crispy topping.

Now that we have our ingredients, let’s jump into the process. Follow these simple steps to create your honey mustard chicken masterpiece:

  • Preheat your oven to 375°F (190°C). Don’t skip this step; a properly heated oven ensures even cooking.
  • Prepare your baking dish: Generously spray a large baking dish with nonstick cooking spray.
  • Season the chicken: Place the chicken breasts in a single layer and season both sides liberally with salt and black pepper.
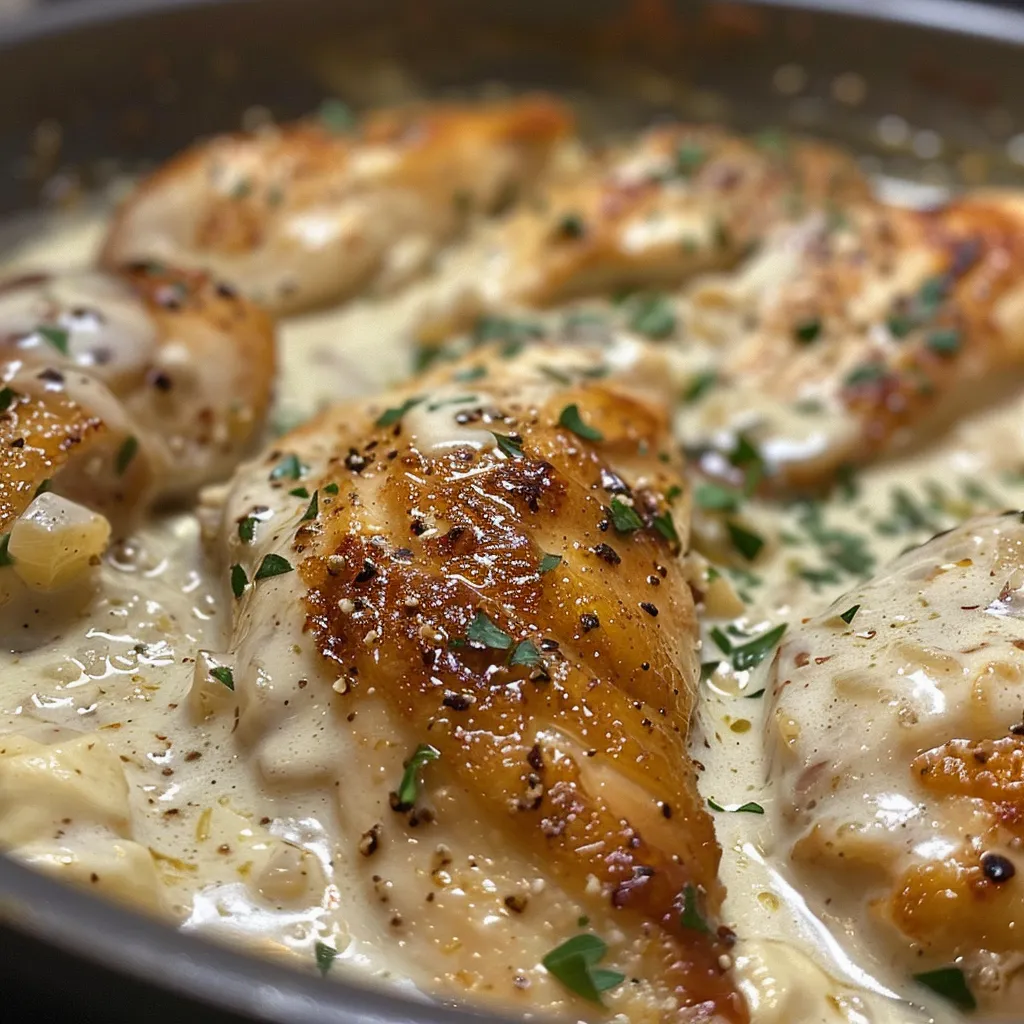
  • Mix the sauce: In a medium bowl, whisk together the honey, mustard, dried basil, paprika, dried parsley, garlic powder, lemon zest, and optional red pepper flakes until smooth.
  • Coat the chicken: Pour the sauce over the chicken, ensuring each piece is generously coated.
  • Cover and bake: Loosely cover the dish with foil and bake for 20 minutes. This traps moisture, making the chicken tender.
  • Uncover and finish baking: Remove the foil and continue baking for an additional 15-20 minutes until the chicken reaches an internal temperature of 165°F (75°C).
  • Rest before serving: Let the chicken rest for 5 minutes, then spoon the delicious pan sauce over each piece.

Pro Tips for Perfect Honey Mustard Chicken

To ensure your dish turns out perfectly every time, keep these expert insights in mind:

  • Use a meat thermometer: Check for doneness; this ensures juicy chicken without the guesswork.
  • Let the chicken marinate: If time allows, marinate the chicken in the sauce for a few hours or overnight for deeper flavor.
  • Experiment with mustards: Try different types of mustard for varied flavor profiles; whole grain mustard adds a nice texture!
  • Don’t skip the resting step: This allows the juices to redistribute, making every bite succulent.
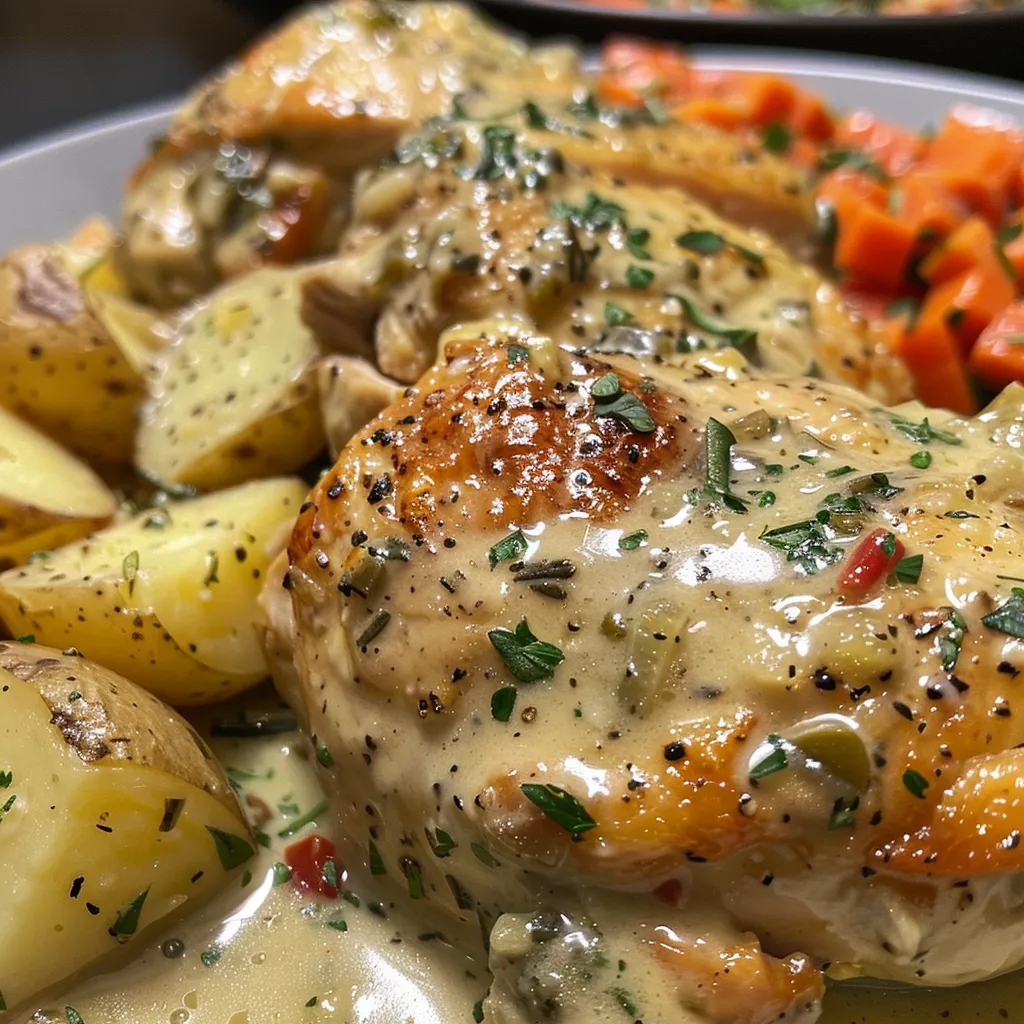
  • Pair with sides: Serve with roasted vegetables or a fresh salad for a balanced meal.
  • Make a double batch: This recipe freezes beautifully, so prep extra for quick meals later on.
  • Consider a glaze finish: Broil the chicken for the last few minutes for a caramelized finish.
  • Try it on a grill: Use the same marinade for grilled chicken during summer—smoky and delicious!

Common Mistakes and Troubleshooting

Even the best of us can make mistakes in the kitchen. Here are some common pitfalls and how to avoid them:

  • Chicken is dry: This can happen if it’s overcooked. Always check the internal temperature with a meat thermometer.
  • Flavor is bland: Ensure you season your chicken well before applying the sauce. Don’t forget to taste the sauce before pouring it on.
  • Sauce is too thick: If the sauce thickens too much, whisk in a little chicken broth or water to achieve the desired consistency.
  • Burnt edges: If your oven runs hot, check the chicken a few minutes early to prevent burning.

Variations to Make This Recipe Your Own

Don’t be afraid to get creative! Here are some variations to consider:

  • Honey Mustard Chicken Thighs: Swap the breasts for bone-in, skin-on thighs for added flavor and juiciness.
  • Herb-Infused Glaze: Add fresh herbs like rosemary or thyme to the sauce for an aromatic twist.
  • Spicy Honey Mustard: Mix in some Sriracha or cayenne pepper for a kick that will awaken your taste buds.
  • Honey Mustard Marinade: Use the marinade as a base for grilled chicken skewers at your next barbecue.

Storage and Make-Ahead Instructions

If you want to make this dish ahead of time, here’s how to store it:

  • Refrigeration: Store leftovers in an airtight container for up to 3 days.
  • Freezing: Freeze cooked chicken in a freezer-safe container for up to 3 months. Thaw in the fridge before reheating.
  • Reheating: Warm gently in the oven or microwave, adding a splash of broth if needed to keep it moist.

Frequently Asked Questions

Here are some common questions about this recipe:

  • Can I use skin-on chicken? Absolutely! Skin-on chicken will yield a richer flavor and crispier texture.
  • What type of mustard works best? Dijon mustard is recommended, but feel free to experiment with your favorites!
  • Can I make this recipe gluten-free? Yes! Ensure your mustard and any other sauces are gluten-free.
  • What sides pair well with this dish? Consider roasted potatoes, steamed broccoli, or a garden salad.
  • Can I double the recipe? Yes! Just make sure you have a baking dish large enough to accommodate all the chicken.
  • How do I know when the chicken is fully cooked? Check for an internal temperature of 165°F (75°C) with a meat thermometer.
  • Is it possible to grill this chicken? Yes, use the same marinade on the grill for a fantastic summer meal.
  • Can I use a slow cooker for this recipe? Sure! Cook on low for 4-6 hours, adding the sauce halfway through cooking.

Nutritional Tips and Dietary Adaptations

Want to make this dish fit your dietary needs? Here are some tips:

  • Low-Carb Option: Serve with sautéed greens instead of starchy sides.
  • Low-Sodium Option: Use low-sodium mustard and limit added salt.
  • Gluten-Free Option: Confirm that all ingredients, especially sauces, are gluten-free.
  • Vegan Alternative: Substitute chicken with firm tofu or tempeh, using a vegan honey alternative.

Equipment Recommendations

To make this recipe a breeze, consider the following equipment:

  • High-quality baking dish: A sturdy dish helps achieve even cooking.
  • Meat thermometer: This tool is essential for checking doneness.
  • Whisk: A good whisk is key for mixing the sauce smoothly.
  • Spatula: Use a spatula to ensure even coating of the chicken in sauce.

Serving Suggestions

Bring your meal to life with these serving ideas:

  • Fresh Herbs: Garnish with chopped parsley or basil for a pop of color.
  • Serve Family-Style: Place the chicken on a large platter for everyone to help themselves.
  • Pair with a Salad: A crisp green salad balances the richness of the chicken.
  • Offer Homemade Bread: A warm loaf of bread is perfect for soaking up the delicious sauce.

Conclusion: Your New Favorite Recipe Awaits

Cooking should be a joyful experience, and this Oven-Baked Honey Mustard Chicken with Herb Crust is sure to become a favorite in your home. With its beautiful balance of flavors and easy preparation, it’s perfect for any occasion. So gather your loved ones, set the table, and enjoy a meal that’s rich in both flavor and memories. Happy cooking, friends!

Oven-Baked Honey Mustard Chicken with Herb Crust

Prep Time 10 minutes
Cook Time 35 minutes
Total Time 45 minutes
Servings 4 servings
Calories 350
A flavorful baked chicken dish featuring a honey mustard glaze and herb crust, perfect for a quick and satisfying meal.

Ingredients

Nonstick cooking spray

  • 12 pieces skinless, boneless chicken breast halves
  • 1 cup honey
  • 1 cup prepared mustard
  • 2 tsp dried basil
  • 1 tsp dried parsley
  • 2 tsp paprika
  • 1 tsp garlic powder
  • 1 zest lemon (zest of 1 lemon)
  • ½ tsp crushed red pepper flakes (optional)

Instructions 

  • Preheat oven to 375°F (190°C) and spray a baking dish with nonstick spray.
  • Arrange chicken in dish, season with salt and pepper.
  • Mix honey, mustard, herbs, spices, and lemon zest; pour over chicken.
  • Cover loosely with foil and bake 20 minutes, then uncover and bake 15-20 more minutes.
  • Rest 5 minutes, then serve with pan sauce spooned over.

Notes

Ensure chicken reaches an internal temperature of 165°F (75°C) before serving.
Calories: 350kcal
Cost: $15
Course: Main Course
Cuisine: American
Keyword: chicken

Welcome to Comfort: The Creamy Garlic Chicken That Wraps You in Warmth

There’s something truly special about a dish that brings warmth to your home and wraps your family in a comforting embrace. This creamy garlic chicken recipe does just that, transforming simple ingredients into a cozy meal that’s perfect for family gatherings or a quiet night in. With the rich flavors of garlic and cream, every bite feels like a warm hug on a chilly evening. Let’s dive into why this dish is not just a meal but a cherished memory waiting to happen.

Why You’ll Love This Creamy Garlic Chicken Recipe

Here are a few reasons why this garlic chicken recipe deserves a spot in your weekly rotation:

  • Quick and Easy: This dish can be on your table in about 30 minutes, making it perfect for busy weeknights.
  • Comforting Flavors: The creamy garlic sauce is rich and savory, striking the perfect balance between indulgent and wholesome.
  • Family-Friendly: With its mild yet flavorful profile, even picky eaters will appreciate this dish.
  • Versatile Pairing: Serve it with rice, pasta, or fresh vegetables; the options are endless, allowing for creative meal planning.
  • Make-Ahead Friendly: Prepare it ahead of time for a stress-free dinner that warms up beautifully.

Ingredients You’ll Need

Gathering the right ingredients is key to making this creamy garlic delight. Here’s what you’ll need:

  • 2 boneless, skinless chicken breasts: About 1.3 lbs total, for tender bites that soak up the sauce.
  • 1/2 tsp Italian seasoning: Adds a subtle herbaceous background without overshadowing the garlic.
  • 1/2 tsp salt: Essential for seasoning the chicken and the sauce.
  • 1/4 tsp freshly cracked black pepper: To enhance the flavors.
  • 1/4 cup all-purpose flour: For coating the chicken, ensuring a golden crust.
  • 2 Tbsp olive oil: For searing the chicken to perfection.
  • 2 Tbsp butter: Divided; adds richness to the sauce.
  • 1 whole garlic bulb: About 8-9 cloves, smashed to release their sweet aroma.
  • 1 cup chicken broth: Enhances the depth of flavor in the sauce.
  • 3/4 cup heavy cream: The star of the sauce, making it creamy and luxurious.
  • 1/2 tsp garlic powder: For an extra boost of garlic flavor.
  • Salt and Pepper to taste: Always adjust to your preference!

How to Make Your Creamy Garlic Chicken

Juicy chicken breast coated in creamy garlic sauce, served in a white bowl.

Follow these easy steps for a dish that’s sure to impress:

  • Step 1: Prep the Chicken: Fillet each chicken breast into two thinner cutlets for even cooking. If you prefer, you can use pre-sliced thin-cut chicken breasts.
  • Step 2: Season & Coat: Season the chicken cutlets with Italian seasoning, salt, and black pepper. Sprinkle flour over both sides and rub it in.
  • Step 3: Sear the Chicken: Heat a large skillet over medium heat. Add olive oil and 1 tablespoon of butter. Once hot, add the chicken, cooking for about 4 minutes per side until golden brown. Remove and cover to keep warm.
  • Step 4: Sauté the Garlic: In the same skillet, add the remaining butter, followed by the smashed garlic. Reduce heat to medium-low, sautéing for 3 minutes until fragrant.
  • Step 5: Create the Sauce: Pour in chicken broth and heavy cream, then stir in garlic powder. Scrape up any browned bits, letting the sauce simmer for 8-10 minutes until reduced and thickened.
  • Step 6: Combine & Serve: Return the chicken to the skillet, spooning the creamy garlic sauce over it. Heat through briefly and serve immediately, optionally garnished with fresh parsley.

Pro Tips for Perfect Creamy Garlic Chicken

To elevate your dish, keep these expert insights in mind:

  • Use Fresh Garlic: Freshly smashed garlic cloves release more flavor than pre-minced.
  • Don’t Rush the Sauté: Allow the garlic to become lightly browned for depth; just avoid burning it.
  • Adjust the Cream: For a lighter sauce, consider half-and-half instead of heavy cream.
  • Spice It Up: Add a pinch of red pepper flakes for a spicy kick!
  • Let It Rest: Allow the chicken to rest after cooking for juicier bites.
  • Make It Ahead: The sauce can be made in advance and stored in the fridge for up to 3 days.
  • Pair Wisely: Serve with crusty bread or a fresh green salad for a complete meal.
  • Use Leftover Chicken: This recipe is perfect for using up leftover rotisserie chicken!

Common Mistakes and Troubleshooting

Even the best of us make mistakes in the kitchen. Here are some troubleshooting tips:

  • Overcooking Chicken: Use a meat thermometer; chicken should reach 165°F to avoid dryness.
  • Too Thick Sauce: If your sauce thickens too much, whisk in a bit more chicken broth to loosen it up.
  • Burned Garlic: If you notice a bitter taste, it might be due to overcooked garlic. Keep stirring and watch the heat closely.
  • Flavorless Sauce: Always taste and adjust seasonings; a bit more salt can make a world of difference.

Delicious Variations to Try

Want to mix things up? Here are some delightful variations:

  • Lemon Garlic Chicken: Add the zest and juice of one lemon for a fresh twist.
  • Mushroom Cream Sauce: Sauté sliced mushrooms with garlic for added earthiness.
  • Spinach & Feta: Stir in fresh spinach and crumbled feta for a Mediterranean flair.
  • Honey Garlic Chicken: Drizzle with honey before serving for a sweet contrast.

Storage and Reheating

Leftovers? No problem! Here’s how to store and reheat:

  • Refrigeration: Store in an airtight container in the fridge for up to 3 days.
  • Freezing: The creamy sauce can be frozen for up to 2 months. Thaw in the fridge before reheating.
  • Reheating: Gently reheat in a skillet over low heat, adding a splash of chicken broth to loosen the sauce.

Frequently Asked Questions

Got questions? Let’s answer some common ones:

  • Can I use frozen chicken breasts for this recipe? Yes, but thaw them beforehand for even cooking.
  • What do I serve with creamy garlic chicken? It pairs beautifully with rice, mashed potatoes, or a fresh salad.
  • Can I make the sauce without heavy cream? Yes, use half-and-half or a dairy-free alternative like coconut milk.
  • How do I know when the chicken is cooked? Use a meat thermometer; chicken should reach 165°F internally.
  • Can I add vegetables to this dish? Absolutely! Broccoli or asparagus would be a great addition.
  • Is this recipe suitable for meal prep? Yes, it stores well and reheats nicely!
  • How long does the sauce last? The sauce can be stored in the fridge for up to 3 days.
  • What can I do if the sauce is too thick? Simply whisk in a little chicken broth or water to reach your desired consistency.

Nutritional Tips and Dietary Adaptations

Want to make this dish even healthier? Here are some options:

  • Low-Calorie Option: Swap heavy cream for Greek yogurt for a lighter option.
  • Dairy-Free: Use coconut milk and vegan butter for a creamy, dairy-free sauce.
  • Gluten-Free: Substitute flour with cornstarch or a gluten-free flour blend.

Must-Have Equipment

Before you start cooking, make sure you have these essentials:

  • Sharp Chef’s Knife: For proper filleting of the chicken.
  • Large Skillet: A heavy-bottomed skillet ensures even cooking.
  • Meat Thermometer: To check for doneness and avoid overcooking.
  • Wooden Spoon: Great for scraping up those lovely browned bits from the pan.

Serving Suggestions

Now that you’ve made this delicious dish, here are some serving ideas:

  • With Rice: Serve it over fluffy white or brown rice to soak up that creamy sauce.
  • On Pasta: Toss it with your favorite pasta for an Italian-inspired meal.
  • With Bread: A side of crusty bread makes for perfect sauce-sopping.
  • Fresh Salad: Complement the richness with a light, zesty salad.

In conclusion, this creamy garlic chicken recipe is more than just a meal; it’s a way to connect with loved ones and create lasting memories. Each bite is a reminder that cooking doesn’t have to be complicated; it’s about care, patience, and letting simple ingredients shine. So, roll up your sleeves and give this heartwarming recipe a try. You won’t just be serving a dish; you’ll be creating a moment to cherish around the dinner table.

Creamy Garlic Chicken Recipe

Prep Time 10 minutes
Cook Time 20 minutes
Total Time 30 minutes
Servings 4 servings
Calories 450
A delicious and creamy garlic chicken dish that's quick to prepare and perfect for a comforting meal.

Ingredients

Chicken

  • 1.3 lbs boneless, skinless chicken breasts (about 1.3 lbs total)
  • 1/2 tsp Italian seasoning
  • 1/2 tsp salt
  • 1/4 tsp freshly cracked black pepper
  • 1/4 cup all-purpose flour
  • 2 Tbsp olive oil
  • 2 Tbsp butter (divided)
  • 1 whole garlic bulb (about 8-9 cloves)
  • 1 cup chicken broth
  • 3/4 cup heavy cream
  • 1/2 tsp garlic powder
  • to taste Salt and Pepper

Instructions 

  • Fillet chicken breasts into thin cutlets and season with Italian seasoning, salt, and pepper. Coat with flour.
  • Heat oil and 1 tbsp butter in a skillet. Cook chicken 4 mins per side until golden. Remove and keep warm.
  • Smash garlic cloves and sauté in remaining butter until fragrant, about 3 mins.
  • Add chicken broth, heavy cream, and garlic powder. Simmer until thickened, 8-10 mins. Season to taste.
  • Return chicken to skillet, spoon sauce over, heat briefly, then serve. Garnish with parsley if desired.

Notes

For extra flavor, garnish with fresh parsley before serving.
Calories: 450kcal
Cost: $15
Course: Main Course
Cuisine: American
Keyword: chicken

Welcome to a Hearty Meal That Feels Like Home

When it comes to comfort food, nothing beats a plate of **Creamy Herb Chicken** served alongside buttery **mashed potatoes** and sweet **glazed carrots**. This dish isn’t just a meal; it’s a warm hug on a plate, reminding us of family gatherings, lazy Sunday dinners, and the simple joys of sharing good food with loved ones. In this comprehensive guide, we will explore every detail of making this **hearty chicken dinner** that will bring back memories of home-cooked meals.

Why You’ll Love This Recipe

This recipe for **Creamy Herb Chicken** is designed to be not only delicious but also easy to prepare. Here are five specific reasons why you’ll adore it:

  • Comfort at Its Core: This dish captures the essence of home cooking, combining tender chicken with a rich, creamy herb sauce that comforts the soul.
  • Simple Ingredients: With just a handful of simple, wholesome ingredients, you can create a meal bursting with flavor that doesn’t require hours in the kitchen.
  • Versatile Pairings: The creamy herb sauce complements a variety of side dishes, making it easy to customize your meal to suit your family’s tastes.
  • Perfect for Any Occasion: Whether it’s a casual weeknight dinner or a special family gathering, this dish fits the bill beautifully.
  • Leftover Friendly: If you have any leftovers, they can easily be transformed into a delicious lunch or dinner the next day, ensuring nothing goes to waste.

Ingredients You’ll Need

Before you start cooking, let’s gather all the ingredients you will need for this **Creamy Herb Chicken**. Here’s a detailed breakdown:

  • Chicken: Use 2-3 boneless, skinless chicken breasts or thighs for a juicy, flavorful base.
  • Seasonings: Salt & pepper to taste, along with 1/2 tsp each of garlic powder, dried thyme, and dried rosemary for that aromatic touch.
  • Cooking Fat: 1 tbsp each of olive oil and butter to sear the chicken beautifully.
  • Flavor Enhancers: 3 cloves of minced garlic, 1/2 cup of chicken broth, and 1/2 cup of heavy cream (or half-and-half) for the sauce.
  • Cheesy Goodness: 1/3 cup of grated Parmesan cheese adds richness and depth to the sauce.
  • Optional Ingredients: A pinch of Dijon mustard for tanginess and 1 tbsp of chopped parsley or chives for garnish.

How to Make the Dish

Side angle of a plate featuring tender creamy herb chicken, fluffy mashed potatoes, and vibrant glazed carrots.

Now that we have everything ready, let’s dive into the cooking process. Follow these simple steps to create your **Creamy Herb Chicken** dinner:

  • Step 1: Make the Mashed Potatoes
    Boil 1.5 lbs of peeled and cubed Yukon gold or russet potatoes in salted water until fork-tender, about 15-20 minutes. Drain and mash with 2-3 tbsp butter, 1/2 cup milk or cream, and salt to taste. Keep warm.
  • Step 2: Glaze the Carrots
    In a saucepan over medium heat, combine 3 cups of baby carrots, 2 tbsp butter, 1 tbsp brown sugar, 1/4 tsp salt, and a splash of water. Cover and simmer for 10-12 minutes until tender and glazed, stirring occasionally. Remove the lid for the last 2-3 minutes to thicken the glaze.
  • Step 3: Cook the Chicken
    Pat the chicken dry and season both sides with salt, pepper, garlic powder, thyme, and rosemary. Heat olive oil and butter in a skillet over medium-high heat. Sear the chicken for 4-5 minutes per side until golden and cooked through. Remove and set aside.
  • Step 4: Make the Herb Cream Sauce
    In the same pan, add minced garlic and cook for 30 seconds. Deglaze with chicken broth, scraping up browned bits from the pan. Stir in cream, Parmesan, and Dijon mustard (if using), and simmer until slightly thickened, about 3-5 minutes.
  • Step 5: Return the Chicken to the Pan
    Spoon the sauce over the chicken and simmer for an additional 2 minutes to meld the flavors.
  • Step 6: Assemble and Serve
    Plate the mashed potatoes and glazed carrots alongside the chicken. Generously drizzle extra sauce over everything and garnish with chopped parsley or chives.

Pro Tips for the Perfect Creamy Herb Chicken

To elevate your dish even further, consider these expert insights:

  • Use Bone-In Chicken: For even more flavor, consider using bone-in chicken pieces. They will be juicier and more flavorful than boneless cuts.
  • Fresh Herbs: If you have fresh herbs available, such as thyme or rosemary, feel free to substitute them for dried ones for an even fresher flavor.
  • Adjust the Creaminess: If you prefer a lighter sauce, you can substitute half of the heavy cream with chicken broth to reduce the richness.
  • Make It Dairy-Free: For a dairy-free option, use coconut cream or cashew cream in place of heavy cream, and nutritional yeast can substitute for Parmesan.
  • Experiment with Flavors: Add a splash of white wine to the sauce for a sophisticated twist, or incorporate lemon juice for brightness.
  • Check for Doneness: Always ensure your chicken reaches an internal temperature of 165°F (75°C) for safe consumption.
  • Stay Organized: Have all your ingredients prepped and measured before starting to make the cooking process smoother and more enjoyable.
  • Don’t Rush the Sauce: Allow the sauce to simmer long enough to develop rich flavors; patience is key!

Common Mistakes and Troubleshooting

Even the best chefs make mistakes! Here are some common pitfalls and how to avoid them:

  • Overcooking the Chicken: Keep a close eye on the chicken as it cooks. Overcooked chicken can become dry. Use a meat thermometer for accuracy.
  • Runny Sauce: If your sauce is too thin, let it simmer a bit longer to thicken. You can also whisk in a cornstarch slurry for a quick fix.
  • Underseasoned Potatoes: Taste and adjust the seasoning in the mashed potatoes before serving. They should be rich and flavorful.
  • Carrots Not Glazing: If the carrots aren’t glazing properly, ensure the heat is high enough to evaporate excess moisture.

Variations of Creamy Herb Chicken

Feel free to mix things up with these variations:

  • Spicy Herb Chicken: Add red pepper flakes to the herb sauce for a kick of heat.
  • Garlic Parmesan Chicken: Increase the amount of garlic and Parmesan cheese in the sauce for a bolder flavor.
  • Mushroom Herb Chicken: Sauté sliced mushrooms with the garlic before adding the cream for a hearty addition.
  • Herb-Crusted Chicken: Before searing, coat the chicken in a mixture of breadcrumbs and fresh herbs for a crispy texture.

Storage and Make-Ahead Instructions

This dish is great for meal prep! Here’s how to store and reheat it:

  • Refrigeration: Store leftovers in an airtight container in the fridge for up to 3-4 days.
  • Freezing: While it’s best fresh, you can freeze the chicken (without sauce) for up to 3 months. Reheat gently before serving.
  • Make-Ahead Tips: Prepare the chicken and sauce ahead of time and store separately. Reheat gently on the stove before serving.

Frequently Asked Questions

Here are some common questions about this recipe:

  • Can I use chicken thighs instead of breasts?
    Yes, chicken thighs work beautifully and will add extra juiciness.
  • Is the sauce gluten-free?
    Yes, as long as you check that your chicken broth is gluten-free, the sauce can be made gluten-free.
  • Can I make this dairy-free?
    Absolutely! Use coconut cream or a plant-based cream substitute.
  • How can I make the dish spicier?
    Add red pepper flakes or a splash of hot sauce to the cream sauce.
  • What can I serve with Creamy Herb Chicken?
    It pairs perfectly with steamed vegetables, rice, or a fresh salad.
  • How do I reheat leftovers?
    Gently reheat in a saucepan over low heat, adding a splash of cream or broth to loosen the sauce.
  • Can I add vegetables to the dish?
    Yes! Sautéed spinach, mushrooms, or bell peppers can be delicious additions.
  • What wine pairs well with this dish?
    A crisp Chardonnay or a light Pinot Noir complements the flavors nicely.

Nutrition Tips and Dietary Adaptations

For those looking to adapt the recipe to fit dietary needs, here are some suggestions:

  • Low-Carb Option: Substitute mashed potatoes with cauliflower mash for a lower-carb alternative.
  • Low-Calorie Version: Use skinless chicken breasts, reduce the amount of cream, and increase the broth for a lighter sauce.
  • Whole30 Compliant: Use coconut cream instead of heavy cream and skip the cheese.

Essential Equipment

Having the right tools makes preparation easier:

  • Skillet: A heavy-bottomed skillet is perfect for searing the chicken and making the sauce.
  • Potato Masher: For smooth, creamy mashed potatoes, a good potato masher is essential.
  • Meat Thermometer: Ensures your chicken is cooked perfectly every time.
  • Whisk: Useful for mixing the sauce and incorporating all ingredients smoothly.

Serving Suggestions

For a complete meal, consider serving your **Creamy Herb Chicken** with:

  • Garlic Bread: A slice of warm garlic bread to mop up the delicious sauce is always a hit.
  • Seasonal Salad: A fresh garden salad topped with your favorite dressing complements the richness of the dish.
  • Roasted Vegetables: Seasonal roasted veggies add color and nutrition to your plate.

In conclusion, this **Creamy Herb Chicken** with **mashed potatoes** and **glazed carrots** is not just a recipe; it’s a culinary journey that brings the comfort of home cooking to your table. With easy steps, expert tips, and a touch of love, you can create a meal that will be treasured by family and friends alike. So roll up your sleeves, gather your ingredients, and let’s make some memories together over a hearty dinner!

Creamy Herb Chicken with Mashed Potatoes & Glazed Carrots: A Complete Comfort Food Dinner

Prep Time 15 minutes
Cook Time 30 minutes
Total Time 45 minutes
Servings 4 servings
Calories 650
A hearty and comforting dinner featuring tender herb-seasoned chicken, creamy mashed potatoes, and sweet glazed carrots, perfect for a cozy family meal.

Ingredients

Protein

  • 2–3 pieces boneless, skinless chicken breasts (or thighs)
  • 1 tsp salt & pepper to taste
  • 0.5 tsp garlic powder
  • 0.5 tsp dried thyme
  • 0.5 tsp dried rosemary
  • 1 tbsp olive oil
  • 1 tbsp butter
  • 3 cloves garlic, minced
  • 0.5 cup chicken broth
  • 0.5 cup heavy cream (or half-and-half)
  • 1/3 cup grated Parmesan cheese
  • 0.5 tsp Dijon mustard (optional)
  • 1 tbsp chopped parsley or chives (for garnish)

Mashed Potatoes

  • 1.5 lbs Yukon gold or russet potatoes, peeled and cubed
  • 0.5 cup milk or cream
  • 2–3 tbsp butter
  • to taste Salt

Glazed Carrots

  • 3 cups baby carrots or sliced carrots
  • 2 tbsp butter
  • 1 tbsp brown sugar or honey
  • 0.25 tsp salt

Instructions

Notes

For extra flavor, add a squeeze of lemon or fresh herbs before serving.
Calories: 650kcal
Cost: $15
Course: Main Course
Cuisine: American
Keyword: chicken, comfort food, glazed carrots, mashed potatoes

Welcome to the Heart of Honey Garlic Chicken

Gather around, friends, as we dive into the sweet and savory world of honey garlic chicken. This delightful dish pairs tender chicken with a rich, sticky sauce that whispers comfort and warmth. Perfect for family weeknight dinners or special gatherings, this recipe comes together in just 20 minutes, making it a favorite in kitchens across the country. Let’s explore why this honey garlic chicken recipe will become a cherished part of your culinary repertoire.

Why You’ll Love This Recipe

This honey garlic chicken recipe isn’t just about taste; it’s a celebration of simplicity and flavor. Here’s why you’ll adore it:

  • Quick & Easy: Ready in just 20 minutes, this recipe is perfect for busy weeknights.
  • Rich Flavor: The balance of sweet honey and savory garlic creates a mouthwatering sauce that complements the chicken beautifully.
  • Versatile: Serve it with rice, veggies, or in wraps—this dish fits into any meal plan effortlessly.
  • Comforting Dish: Every bite reminds you of home-cooked meals and family gatherings, bringing back sweet memories.
  • Healthy Option: Using skin-on bone-in chicken thighs ensures you keep the moisture while enjoying a nutritious meal.

Ingredients Breakdown

Let’s look closely at the ingredients, ensuring that you know what goes into this delicious dish:

  • Chicken Thighs: 4 skin-on bone-in chicken thighs (you can substitute with boneless skinless thighs for a quicker cook). These cuts provide rich flavor and tenderness.
  • Vegetable Oil: 2 tsp of any neutral oil helps in frying the chicken until crispy.
  • Seasonings: Salt (1/2 tsp), black pepper (1/4 tsp), and garlic powder (3/4 tsp) enhance the chicken’s natural flavor.
  • Fresh Garlic: 5 cloves, minced; this is essential for that signature garlic flavor.
  • Honey: 1/4 cup adds sweetness; if you’re allergic, consider maple syrup, brown sugar, or light corn syrup.
  • Cold Water: 3 tbsp for mixing the sauce.
  • Vinegar: 1 tablespoon (rice, white, or apple cider vinegar) for a touch of acidity.
  • Soy Sauce: 1/2 tablespoon brings depth and umami to the dish.
  • Sesame Oil: 2 tsp adds a lovely nutty flavor.
  • Cornstarch: 1 tsp (or potato/tapioca starch) for thickening the sauce.

Pro Tips for Perfect Honey Garlic Chicken

Close-up view of cooked chicken thighs coated in a glossy honey garlic sauce.

To ensure your honey garlic chicken turns out perfectly every time, here are some expert insights:

  • Pat Dry: Always pat the chicken dry before seasoning; this ensures a crispy skin.
  • Preheat the Pan: Make sure your pan is hot before adding the chicken for a nice sear.
  • Flip Carefully: Once the sauce is added, gently flip the chicken to avoid breaking the skin.
  • Use a Thermometer: Ensure your chicken reaches an internal temperature of 165°F for safety and optimal juiciness.
  • Let it Rest: Allow the chicken to rest after cooking—this keeps it juicy and flavorful.
  • Customize the Sauce: Feel free to add chili flakes for heat or ginger for a different flavor profile.
  • Thicker Sauce: For a thicker sauce, let it simmer longer after adding the cornstarch.
  • Garnish: Fresh green onions or sesame seeds add a beautiful finish and extra flavor.

Avoid Common Mistakes

Even the best chefs can stumble. Here’s how to avoid common hiccups:

  • Overcrowding the Pan: Cooking too many pieces at once can lower the pan temperature, leading to steaming instead of searing.
  • Not Enough Sauce: If you find the sauce isn’t coating well, add a bit more honey or soy sauce until the right consistency is achieved.
  • Skipping the Resting Step: Cutting into chicken immediately after cooking can let the juices escape, resulting in dry meat.

Variations on Honey Garlic Chicken

Want to switch things up? Here are some tasty variations to try:

  • Honey Garlic Chicken with Broccoli: Add steamed or sautéed broccoli to the mix for a healthy veggie boost.
  • Spicy Honey Garlic Chicken: Incorporate sriracha or red pepper flakes for a kick of heat.
  • Honey Garlic Chicken Stir-Fry: Toss in a mix of colorful bell peppers and snap peas for a quick stir-fry version.
  • Honey Garlic Chicken Skewers: Marinate cubed chicken and grill on skewers for a fun outdoor meal.

Storage and Make-Ahead Instructions

Planning to make this dish ahead of time? Here’s how to store and reheat:

  • Refrigeration: Store leftovers in an airtight container for up to 3 days in the fridge.
  • Freezing: This dish can be frozen for up to 3 months. Thaw in the refrigerator overnight before reheating.
  • Reheating: Gently reheat in a pan over low heat to avoid drying out the chicken. You can also use the microwave—just cover it to retain moisture.

Frequently Asked Questions

Here are some common questions about honey garlic chicken:

  • Can I use chicken breast instead of thighs? Absolutely! Chicken breasts are leaner and can be used, but may require less cooking time.
  • How can I make this dish gluten-free? Use gluten-free soy sauce, and ensure your cornstarch is labeled gluten-free.
  • Can I double the recipe? Yes, simply adjust cooking time as needed and ensure your pan isn’t overcrowded.
  • What should I serve with honey garlic chicken? Rice, quinoa, or a fresh salad pair beautifully with this dish.
  • Is this recipe healthy? It can be! Use less honey and serve with plenty of vegetables to boost its nutritional value.
  • How can I adjust the sweetness? Feel free to reduce the honey to your taste; taste as you go!
  • Can I add vegetables? Yes! Consider adding bell peppers, carrots, or snap peas into the sauce.
  • How long does it take to cook chicken thighs? Bone-in thighs typically take about 20-25 minutes total, depending on size.

Nutritional Tips and Dietary Adaptations

This honey garlic chicken can easily fit into various dietary needs:

  • Low-Carb: Serve with cauliflower rice instead of traditional rice.
  • Paleo-Friendly: Substitute honey with coconut nectar for a paleo-friendly option.
  • Whole30 Approved: Replace soy sauce with coconut aminos for a Whole30-friendly dish.

Essential Equipment

Here’s what you’ll need:

  • Large Skillet: A good, heavy skillet is essential for even cooking.
  • Digital Meat Thermometer: This ensures your chicken is cooked perfectly every time.
  • Measuring Cups and Spoons: For precise ingredient measurements.
  • Sharp Knife: For deboning and chopping the chicken.

Serving Suggestions

Make your meal complete with these serving ideas:

  • Rice: Serve over jasmine or brown rice to soak up the delicious sauce.
  • Salad: Pair with a simple green salad drizzled with vinaigrette for a refreshing contrast.
  • Wraps: Use in wraps with fresh veggies for a quick lunch option.

Conclusion

In just a matter of minutes, you can bring a taste of comfort to your table with this easy honey garlic chicken. As you savor each bite, let it remind you of the warmth of home and the joy of sharing meals with loved ones. So, roll up your sleeves, gather your ingredients, and let the magic of this recipe unfold in your kitchen. Thank you for joining me, and happy cooking!

Easy 20-min. Honey Garlic Chicken

Prep Time 5 minutes
Cook Time 15 minutes
Total Time 20 minutes
Servings 4 servings
Calories 350
This quick and flavorful honey garlic chicken is perfect for a weeknight dinner, ready in just 20 minutes with tender, juicy thighs coated in a sweet and savory sauce.

Ingredients

Meat

  • 4 pieces skin-on bone-in chicken thighs (or boneless skinless thighs)
  • 2 tsp vegetable oil (or any neutral oil)
  • 1/2 tsp salt
  • 1/4 tsp black pepper
  • 3/4 tsp garlic powder
  • 5 cloves garlic (minced)
  • 1/4 cup honey (or maple syrup/brown sugar/light corn syrup if allergic)
  • 3 tbsp water (cold)
  • 1 tablespoon rice vinegar (or white vinegar or apple cider vinegar)
  • 1/2 tablespoon soy sauce (regular)
  • 2 tsp sesame oil
  • 1 tsp cornstarch (or potato starch/tapioca starch)

Instructions 

  • Debone the chicken thighs and pat dry.
  • Season the chicken with salt, pepper, and garlic powder.
  • Heat oil in a pan, cook chicken skin side down until golden, then flip and cook through.
  • Mix honey, garlic, water, vinegar, soy, sesame oil, and cornstarch to make sauce. Pour over chicken and simmer until thickened.
  • Flip chicken briefly to absorb sauce, garnish with green onions, then slice and serve.

Notes

Ensure chicken reaches an internal temperature of 165°F for safety.
Calories: 350kcal
Cost: $15
Course: Main Course
Cuisine: American
Keyword: chicken, Garlic, honey

Welcome to the Heart of Fajitas: A Recipe That Brings Family Together

Gather ’round, friends! Today, we’re diving into a dish that’s more than just a meal; it’s a celebration of togetherness, laughter, and love. Fajitas, with their tender chicken, vibrant bell peppers, and tantalizing spices, are the perfect way to warm your kitchen and your heart. This recipe not only showcases how simple ingredients can ignite beautiful memories but also fits snugly into your budget. Let’s roll up our sleeves and get cooking!

Why You’ll Love This Recipe

  • Quick & Easy: With a prep time of just 20 minutes, you can have a delicious dinner on the table in no time, perfect for busy weeknights.
  • Budget-Friendly: This recipe is designed with affordability in mind, making it a great option for families looking to enjoy tasty meals without breaking the bank.
  • Customizable: Tailor your fajitas to your taste! Swap out ingredients or add your favorite toppings for a personal touch.
  • Health-Conscious: Packed with veggies and lean protein, these fajitas are a nutritious option that won’t leave you feeling guilty.
  • Family-Friendly: Get the kids involved! Everyone can help in assembling their own fajitas, turning dinner into a fun family activity.

Ingredient Breakdown

Let’s take a closer look at our ingredients. Each one plays a vital role in creating that mouth-watering flavor we all crave.

  • Chicken Breasts: The star of the show! Use boneless, skinless chicken breasts for an easy, economical option. You can even use frozen strips in a pinch.
  • Bell Peppers: Choose a mix of colors for a vibrant presentation. If you’re short on time, pre-cut frozen bell peppers work great too.
  • Taco Seasoning: A blend of spices that brings everything together. Feel free to make your own blend for a personal twist!
  • Tortillas: Flour or corn, it’s up to you! Flour tortillas are softer, while corn tortillas offer a traditional taste.

Pro Tips for Perfect Fajitas

Juicy chicken and vibrant bell peppers served on warm tortillas, ready to eat.

Here are some expert insights to elevate your fajita-making game:

  • Marinate Overnight: For the best flavor, marinate your chicken in taco seasoning and a splash of lime juice overnight.
  • High Heat: Cook your chicken over high heat to achieve that perfect sear and juicy interior.
  • Don’t Overcrowd the Pan: This allows for caramelization. Cook in batches if necessary.
  • Fresh Ingredients: Use fresh vegetables for a crunchier texture and brighter flavor.
  • Let It Rest: Allow your chicken to rest for a few minutes after cooking. This keeps it juicy!
  • Warm Tortillas: Heat your tortillas in a dry skillet or wrap them in foil and place them in the oven to enhance their flavor.
  • Top It Off: Add fresh toppings like avocado, cilantro, or lime juice for an extra flavor boost.
  • Use a Cast-Iron Skillet: For that authentic charred flavor, a cast-iron skillet works wonders!

Avoiding Common Mistakes

Even the best cooks make mistakes. Here’s how to avoid some common pitfalls:

  • Overcooked Chicken: Keep an eye on your chicken. Cook just until it’s no longer pink to maintain juiciness.
  • Too Much Spice: Adjust your taco seasoning according to your taste. You can always add more but can’t take it away!
  • Skipping the Marination: Don’t rush this step! If time allows, marinate your chicken for maximum flavor.

Delicious Variations

Feel free to mix things up a bit! Here are some variations of our fajitas:

  • Veggie Fajitas: Load up on mushrooms, zucchini, and asparagus for a delightful vegetarian option.
  • Beef or Shrimp Fajitas: Swap out chicken for thinly sliced beef or shrimp for a different protein experience.
  • Spicy Fajitas: Add jalapeños or a dash of cayenne pepper to your taco seasoning for an extra kick.
  • Breakfast Fajitas: Scramble some eggs with your fajita veggies for a hearty breakfast twist.

Storage and Make-Ahead Instructions

Planning ahead is key! Here’s how to store your fajitas:

  • Refrigerating: Store any leftovers in an airtight container in the fridge for up to 3 days.
  • Freezing: You can freeze cooked chicken fajitas for up to 3 months. Just reheat and enjoy!
  • Make-Ahead: Marinate the chicken the night before for an easy, quick meal the next day.

Frequently Asked Questions

Here are some common questions about fajitas:

  • Can I use frozen chicken? Yes, just ensure it’s fully thawed before marinating and cooking.
  • What’s the best way to slice chicken for fajitas? Slice against the grain for tender pieces.
  • How do I know when my chicken is done? Use a meat thermometer; chicken should reach 165°F (75°C).
  • Can I prepare the fajitas in advance? Yes, you can prep most components ahead of time.
  • What toppings do you recommend? Avocado, sour cream, salsa, and fresh cilantro are all great choices!
  • Are fajitas gluten-free? Yes, if you use corn tortillas and ensure your seasoning is gluten-free.
  • How do I make fajitas spicier? Add more chili powder or fresh jalapeños to the mix.
  • What’s the best way to heat tortillas? A skillet or oven is best for warming tortillas without drying them out.

Nutritional Tips and Dietary Adaptations

This recipe is versatile and can be adjusted to meet various dietary needs:

  • Low-Carb Option: Use lettuce wraps instead of tortillas for a low-carb alternative.
  • Dairy-Free: Skip the cheese and sour cream for a dairy-free version.
  • Whole30 Compliant: Use compliant tortillas or lettuce wraps and ensure your taco seasoning is free of additives.

Recommended Equipment

To make your cooking experience smoother, consider these tools:

  • Cast-Iron Skillet: For the best flavor and sear.
  • Meat Thermometer: To check for doneness accurately.
  • Mixing Bowls: For marinating and mixing ingredients.

Serving Suggestions

Fajitas are best served hot and fresh! Here are some ideas:

  • Family Style: Serve everything on a large platter and let everyone build their own fajitas.
  • With Rice: Pair with a side of cilantro-lime rice or refried beans for a complete meal.
  • As a Snack: Use leftovers as a filling for quesadillas or wraps the next day!

Conclusion: A Dish to Remember

In the end, making fajitas is about more than just cooking; it’s about creating memories around the table. With each bite, you’ll taste the warmth of home and the joy of gathering with loved ones. So, roll up your sleeves, get your family involved, and enjoy the process. Happy cooking and even happier feasting!

Fajitas

Prep Time 10 minutes
Cook Time 15 minutes
Total Time 25 minutes
Servings 4 servings
Calories 450
Enjoy flavorful chicken fajitas with colorful peppers wrapped in warm tortillas, perfect for a quick and satisfying meal.

Ingredients

Protein

  • 2 pieces Chicken Breasts

Vegetables

  • 2 pieces Bell Pepper (Any color, sliced)

Spices

  • 1 packet Taco Seasoning

Carbohydrates

  • 4 pieces Tortillas (Flour or corn)

Instructions 

  • Slice the chicken breasts and bell peppers.
  • Cook the chicken in a skillet until browned, then add peppers and seasoning.
  • Cook until vegetables are tender and chicken is cooked through.
  • Warm the tortillas in a separate pan or microwave.
  • Serve the chicken and peppers wrapped in tortillas.

Notes

For extra flavor, add toppings like sour cream, cheese, or salsa.
Calories: 450kcal
Cost: $12
Course: Main Course
Cuisine: Mexican
Keyword: chicken

The Heart and Soul of Comfort Food

Welcome to a culinary journey where simple ingredients transform into something extraordinary. Today, we’ll dive into the heartwarming recipe for Creamy Tomato Chicken Pasta—a dish that’s more than just a meal; it’s a gathering of flavors that brings family and friends together. This delightful pasta features tender chicken, rich cream, and vibrant tomatoes, making it perfect for family gatherings or a cozy night in. Whether you’re a seasoned chef or a kitchen novice, this recipe is designed to be approachable and satisfying. Let’s explore why you’ll love this dish and how to make it shine.

Why You’ll Love This Recipe

  • Quick and Easy: This recipe is ready in about 30 minutes, so you can whip it up even on your busiest days.
  • Comforting and Satisfying: The combination of creamy sauce and tender chicken creates a dish that feels like a warm hug.
  • Versatile Ingredients: With simple pantry staples, you can customize the recipe to suit your taste. Got leftovers? Use them!
  • One-Pan Wonder: Minimal cleanup required! Everything cooks in one skillet, saving you time and effort.
  • Family-Friendly: This dish is a hit with kids and adults alike, making it perfect for family dinners.

Ingredient Breakdown

Let’s take a closer look at the ingredients you’ll need to create this creamy delight:

  • 8 ounces rotini pasta (uncooked): You can substitute with penne or farfalle if you prefer.
  • 3 tablespoons butter (unsalted): For richness. You could use olive oil for a lighter option.
  • 1 pound chicken breast (skinless and boneless, cut into bite-sized pieces): Feel free to use thighs for more flavor or a plant-based chicken substitute.
  • 2 tablespoons chili powder: This adds a mild heat. Adjust according to your spice preference.
  • ½ teaspoon red chili flakes: Optional, for an extra kick.
  • ½ teaspoon salt (or to taste): Essential for flavor enhancement.
  • ¼ teaspoon pepper (or to taste): Freshly cracked pepper is best.
  • 1 cup tomatoes (chopped): Fresh or canned will work; just ensure they’re ripe and flavorful.
  • 6 green onions (chopped): Adds a mild onion flavor and color.
  • ½ cup parsley (fresh, chopped): For a fresh, herbal lift.
  • 1 cup heavy cream (or half and half): The creaminess that makes this dish comforting.
  • ½ cup chicken broth (low sodium or no sodium added): Enhances the flavor without overpowering the dish.
  • 1 cup mozzarella cheese (shredded): Melts beautifully and adds a cheesy goodness.

How to Make Creamy Tomato Chicken Pasta

Side shot of a bowl filled with creamy tomato chicken pasta, showcasing rotini, chicken, and cheese.

Follow these simple steps to create a meal that warms the heart:

Step 1: Cook the Pasta

Cook the rotini pasta according to package instructions until it’s al dente (cooked until it’s still firm when bitten). Drain and set aside.

Step 2: Sauté the Chicken

Melt the butter in a large skillet over medium-high heat. Add the chicken to the skillet, then sprinkle with chili powder, red chili flakes, salt, and pepper. Cook until the chicken is no longer pink, about 5 minutes.

Step 3: Add Vegetables and Herbs

Add the chopped tomatoes, green onions, and parsley. Stir and cook for another 2 minutes until fragrant.

Step 4: Make the Sauce

Pour in the heavy cream and chicken broth, and bring to a gentle boil.

Step 5: Combine and Serve

Add the cooked rotini pasta to the skillet, stirring everything together until well combined. Sprinkle with mozzarella cheese and extra parsley if preferred. Serve while warm.

Pro Tips for Making the Recipe

  • Prep Ahead: Chop your vegetables and chicken ahead of time to make cooking quicker during the week.
  • Don’t Overcook the Pasta: Aim for al dente; it will continue to cook when mixed with the sauce.
  • Adjust the Spice: If you’re not a fan of heat, reduce the chili powder and skip the red pepper flakes.
  • Experiment with Cheeses: Try different cheeses like parmesan or cheddar for varied flavors.
  • Fresh Herbs: Use fresh basil or thyme for an aromatic twist.
  • Let it Simmer: Allow the sauce to simmer a little longer if you prefer a thicker consistency.
  • Make it Creamy: If you want a richer sauce, add more cream or use a combination of cream and sour cream.
  • Save the Leftovers: Store any leftovers in an airtight container in the fridge for up to 3 days.

Common Mistakes and Troubleshooting

Even the best of us make mistakes in the kitchen. Here are some common pitfalls and how to avoid them:

  • Overcooking Chicken: Make sure to check the chicken for doneness. It should be cooked through but still moist.
  • Too Much Heat: If the dish turns out spicier than expected, balance it with a dollop of sour cream or yogurt.
  • Thick Sauce: If your sauce is too thick, add a splash of chicken broth or water to loosen it up.
  • Dry Pasta: If the pasta absorbs too much sauce, consider reserving some pasta water to mix in later.

Variations of Creamy Tomato Chicken Pasta

Don’t be afraid to get creative! Here are some variations to try:

  • Pasta Primavera: Add your favorite vegetables like bell peppers, zucchini, or spinach for extra nutrition.
  • Spicy Cajun Chicken Pasta: Substitute the chili powder with Cajun seasoning for a zesty kick.
  • One-Pot Wonder: Combine all ingredients in one pot, adding the uncooked pasta directly to the sauce for a quicker cleanup.
  • Vegan Option: Use plant-based chicken, coconut cream, and nutritional yeast for a dairy-free version.

Storage and Make-Ahead Instructions

This dish is perfect for meal prep! Here’s how to store and reheat:

  • In the Fridge: Store leftovers in an airtight container for up to 3-4 days.
  • Freezing: You can freeze the pasta for up to 2 months. Just make sure to allow it to cool completely before transferring to a freezer-safe container.
  • Reheating: When ready to enjoy, reheat on the stovetop over low heat, adding a splash of broth or cream to rehydrate the sauce.

Frequently Asked Questions

  • Can I use different pasta shapes?
    Absolutely! Feel free to use any pasta shape you enjoy, such as penne or fusilli.
  • What can I serve with this dish?
    This pasta pairs wonderfully with a fresh salad, garlic bread, or a side of roasted vegetables.
  • Can I make this ahead of time?
    Yes! You can prepare the chicken and sauce ahead of time, just add the pasta right before serving.
  • How do I make it vegetarian?
    Substitute the chicken with tofu or chickpeas, and use vegetable broth instead.
  • Can I use canned tomatoes?
    Yes, canned tomatoes work well in this recipe, especially during off-seasons.
  • How spicy is this dish?
    The spice level can be adjusted based on the amount of chili powder and red pepper flakes you use.
  • What if I don’t have chicken broth?
    You can use vegetable broth or even water in a pinch.
  • How do I store leftovers?
    Keep leftovers in an airtight container in the fridge for up to 3-4 days.

Nutritional Tips and Dietary Adaptations

This dish can be adapted to fit various dietary needs:

  • Lower Calorie Option: Use low-fat cream or substitute with Greek yogurt.
  • Gluten-Free: Swap regular pasta for gluten-free pasta made from rice or quinoa.
  • Dairy-Free: Use coconut milk or almond milk in place of cream, and vegan cheese if desired.

Equipment Recommendations

To make this recipe effortlessly, here are some kitchen tools you might need:

  • Large Skillet: A deep skillet is ideal for sautéing chicken and making the sauce.
  • Pasta Pot: A large pot for boiling pasta is essential for this recipe.
  • Measuring Cups and Spoons: Accurate measurements ensure the best flavor balance.
  • Wooden Spoon: Perfect for stirring ingredients without scratching your cookware.

Serving Suggestions

This Creamy Tomato Chicken Pasta is truly comforting on its own, but here are some ideas to elevate your meal:

  • Garnish with Fresh Herbs: A sprinkle of fresh parsley or basil adds a lovely touch.
  • Pair with a Salad: A simple green salad with a tangy vinaigrette complements the rich pasta.
  • Serve with Bread: Warm, crusty bread is perfect for scooping up that creamy sauce.
  • Wine Pairing: A light Chardonnay or a fruity Pinot Grigio would pair beautifully with this dish.

In conclusion, this Creamy Tomato Chicken Pasta is a dish that not only satisfies your hunger but also warms your heart. It’s rooted in tradition yet flexible enough to allow for personalization. So gather your family, whip up this recipe, and watch as it becomes a cherished favorite in your home. Happy cooking!

Creamy Tomato Chicken Pasta

Prep Time 10 minutes
Cook Time 20 minutes
Total Time 30 minutes
Servings 4 servings
Calories 650
A delicious and creamy pasta dish featuring tender chicken, fresh tomatoes, and melted mozzarella, perfect for a comforting meal.

Ingredients

Pasta

  • 8 ounces rotini pasta (uncooked)

Dairy

  • 3 tablespoons butter (unsalted)
  • 1 pound chicken breast (skinless and boneless, cut into bite size pieces)
  • 1 cup heavy cream (or half and half)
  • 0.5 cup chicken broth (low sodium or no sodium added)

Spices & Herbs

  • 2 tablespoons chili powder
  • 0.5 teaspoon red chili flakes
  • 0.5 teaspoon salt (or to taste)
  • 0.25 teaspoon pepper (or to taste)

Vegetables

  • 1 cup tomatoes (chopped)
  • 6 green onions (chopped) green onions
  • 0.5 cup parsley (fresh, chopped)

Cheese

  • 1 cup mozzarella cheese (shredded)

Instructions 

  • Cook the pasta until al dente, then drain and set aside.
  • Melt butter in a large skillet over medium-high heat. Add chicken, spices, salt, and pepper; cook until no longer pink, about 5 minutes.
  • Add tomatoes, green onions, and parsley; cook for 2 minutes. Pour in heavy cream and chicken broth; bring to a boil.
  • Stir in cooked pasta, then sprinkle with mozzarella cheese and additional parsley if desired. Serve warm.

Notes

For extra flavor, add a squeeze of lemon or a dash of hot sauce before serving.
Calories: 650kcal
Cost: $15
Course: Main Course
Cuisine: American
Keyword: Pasta

Welcome to the Heart of General Tso’s Chicken

Ah, General Tso’s Chicken! This delightful dish is more than just a staple in Chinese restaurants; it’s a celebration of flavors that brings families together around the dining table. With its crispy chicken enveloped in a sweet and spicy sauce, it captures the essence of comfort food. In this comprehensive guide, we’ll explore every aspect of making General Tso’s Chicken, ensuring you have not just a recipe but a culinary experience that resonates with the warmth of home-cooked meals.

Why You’ll Love This Recipe

There’s something special about General Tso’s Chicken that makes it a favorite for many. Here are some compelling reasons to try this recipe:

  • Perfect Balance of Flavors: The sweet, tangy, and spicy sauce is a delightful contrast to the crispy chicken, making each bite a flavor explosion.
  • Comforting and Satisfying: This dish is like a warm hug on a plate, perfect for family gatherings or a cozy night in.
  • Easy to Make: With simple ingredients and clear instructions, you don’t need to be a culinary expert to create this dish at home.
  • Customizable: You can easily tweak the spice level or even substitute ingredients based on what you have at home.
  • Great for Meal Prep: Make a big batch and enjoy leftovers throughout the week; it reheats beautifully!

Ingredient Breakdown

Let’s dive into the star players of this recipe and discuss some substitutions to ensure you’re ready to cook!

  • Chicken Breasts: 4 boneless chicken breasts, cubed. If you prefer dark meat, chicken thighs work wonderfully for extra juiciness.
  • All-Purpose Flour: 1 cup, or substitute with cornstarch for a gluten-free option.
  • Paprika: 1 tsp, adding a touch of warmth and color.
  • Garlic Salt: 2 tsp, for that savory, aromatic kick.
  • Sugar: 1 1/4 cup, but you can reduce this if you like it less sweet.
  • White Distilled Vinegar: 1 cup, for acidity and brightness; rice vinegar can also be used for a milder flavor.
  • Salt: 1 tsp, to enhance all the flavors.
  • Soy Sauce: 6 Tbsp, a staple for umami richness; use low-sodium if you’re watching your salt intake.
  • Red Chili Pepper Flakes: 1 tsp (optional), adjust to your spice preference!

How to Make General Tso’s Chicken

Close-up of crispy General Tso's Chicken garnished with green onions.

Now that you have all your ingredients, let’s get down to the nitty-gritty of making this beloved dish.

Preparation Steps

1. **Marinate the Chicken**: Combine the cubed chicken with garlic salt, paprika, and a drizzle of soy sauce. Let it marinate for at least 30 minutes.

2. **Prepare the Batter**: In a bowl, mix the all-purpose flour (or cornstarch) with a pinch of salt. This will create a light, crispy coating.

3. **Fry the Chicken**: Heat oil in a deep pan. Dredge the marinated chicken in the flour mixture and fry until golden brown and crispy. Drain on paper towels.

4. **Make the Sauce**: In a separate pan, combine sugar, vinegar, soy sauce, and chili flakes. Bring to a simmer until the sugar dissolves.

5. **Combine**: Add the fried chicken pieces to the sauce, ensuring they’re well coated. Cook for an additional 2-3 minutes to absorb the flavors.

Pro Tips for Ultimate Success

To take your General Tso’s Chicken to the next level, keep these tips in mind:

  • Double Frying: For extra crispiness, fry the chicken twice—once for cooking and again for a golden finish.
  • Batch Cooking: Don’t overcrowd the pan when frying; it ensures each piece gets that perfect crunch.
  • Adjust the Sweetness: Taste your sauce before adding all the sugar; you can always add more if necessary.
  • Storage Tip: Allow the chicken to cool before storing to prevent sogginess.
  • Go Fresh: Using fresh garlic and ginger can significantly enhance the flavor of your sauce.
  • Pairing Suggestions: Serve with steamed rice or sautéed broccoli for a complete meal.
  • Experiment with Ingredients: Feel free to add vegetables like bell peppers or snap peas for extra color and nutrition.
  • Make It Ahead: The chicken can be fried ahead of time and reheated just before serving for convenience.

Common Mistakes and Troubleshooting

Even the best cooks can face challenges. Here are some common pitfalls and how to avoid them:

  • Soggy Chicken: Ensure the oil is hot enough before frying to achieve a crispy texture.
  • Too Sweet: If the sauce turns out too sweet, balance it with additional soy sauce or vinegar.
  • Sticky Sauce: If the sauce is too thick, add a splash of water to thin it out.
  • Overcooked Chicken: Fry the chicken pieces in small batches to maintain the right cooking temperature.

Variations of General Tso’s Chicken

If you’re feeling adventurous, try these variations:

  • General Tso’s Cauliflower: Substitute chicken with cauliflower for a delightful vegetarian option.
  • Spicy General Tso’s Chicken: Add more chili flakes or toss in sliced fresh chili peppers for some heat.
  • Orange Chicken Style: Incorporate orange juice and zest into the sauce for a citrusy twist.
  • General Tso’s Tofu: Swap chicken for crispy tofu for a plant-based alternative that still packs flavor.

Storage and Make-Ahead Instructions

General Tso’s Chicken can be a lifesaver for meal prep!

  • Refrigeration: Store any leftovers in an airtight container for up to 3 days.
  • Freezing: For longer storage, freeze the chicken before adding the sauce. It can last up to 3 months.
  • Reheating: Reheat in a skillet over medium heat for best results, adding a splash of water to keep it moist.

Frequently Asked Questions

Here are some common inquiries about General Tso’s Chicken:

  • Is General Tso’s Chicken spicy? It can be adjusted to your taste; simply add or reduce chili flakes.
  • Can I use chicken thighs instead of breasts? Absolutely! Thighs provide more flavor and moisture.
  • What can I serve with General Tso’s Chicken? Steamed rice, stir-fried vegetables, or a fresh salad pair excellently.
  • Can I make this dish gluten-free? Yes! Use gluten-free soy sauce and cornstarch instead of flour.
  • How can I make the sauce thicker? You can mix a bit of cornstarch with water and stir it in while the sauce is cooking.
  • What’s the origin of General Tso’s Chicken? This dish is believed to have originated in Hunan, China, but it was popularized in the U.S. in the 1970s.
  • Can I bake General Tso’s Chicken? Yes, bake the coated chicken at 400°F (200°C) until golden for a healthier version.
  • How do I know when the chicken is cooked? The chicken should reach an internal temperature of 165°F (75°C).

Nutritional Tips and Dietary Adaptations

This General Tso’s Chicken can fit into various dietary needs:

  • Low-Carb Option: Use almond flour instead of all-purpose flour for a lower-carb version.
  • Reduced Sugar: Substitute half the sugar with a sugar alternative like erythritol.
  • High-Protein Meal: Serve with quinoa or edamame for an extra protein boost.

Equipment Recommendations

To achieve the best results, consider using these essential tools:

  • Deep Fryer: For perfectly crispy chicken every time.
  • Non-Stick Skillet: Great for making the sauce without sticking.
  • Meat Thermometer: Ensures your chicken is cooked to perfection.

Serving Suggestions

Here are some delightful ideas to elevate your dining experience:

  • Garnish with Sesame Seeds: Sprinkle toasted sesame seeds on top for added crunch.
  • Side of Broccoli: Steamed broccoli not only adds color but also complements the dish perfectly.
  • Serve with Jasmine Rice: The fluffy rice soaks up the delicious sauce beautifully.

Conclusion

Making General Tso’s Chicken at home isn’t just about following a recipe; it’s about creating memories and sharing love through food. As you gather around the table with family and friends, this dish will not only satisfy appetites but also warm hearts. So roll up your sleeves, embrace the process, and let this sweet and spicy chicken bring everyone to the table. Happy cooking!

General Tso's Chicken

Prep Time 15 minutes
Cook Time 20 minutes
Total Time 35 minutes
Servings 4 servings
Calories 450
A flavorful Chinese-American dish featuring crispy chicken in a tangy, sweet, and spicy sauce.

Ingredients

Chicken

  • 4 pieces chicken breasts (cubed)
  • 1 cup all-purpose flour (or cornstarch)
  • 1 tsp paprika
  • 2 tsp garlic salt
  • 1 1/4 cup sugar
  • 1 cup water
  • 1 cup white distilled vinegar
  • 1 tsp salt
  • 6 Tbsp soy sauce
  • 1 tsp red chili pepper flakes (optional)

Instructions 

  • Coat the cubed chicken in flour or cornstarch.
  • Fry the chicken until golden and crispy.
  • In a saucepan, combine water, sugar, vinegar, soy sauce, salt, and chili flakes; bring to a boil.
  • Pour the sauce over the fried chicken and toss to coat.
  • Serve hot with rice or vegetables.

Notes

Adjust chili flakes to taste for spiciness.
Calories: 450kcal
Cost: $15
Course: Main Course
Cuisine: Chinese-American
Keyword: chicken

Discover the Heartwarming Magic of Marry Me Chicken Pasta

When it comes to comfort food that feels like a warm hug from your grandmother, few dishes can compete with Marry Me Chicken Pasta. This recipe is not just about the delicious combination of tender chicken, creamy sauce, and luscious pasta; it’s about the memories created around the dinner table, the laughter shared, and the love stirred into every bite. Whether you’re cooking for a special someone or simply indulging yourself, this dish brings joy to every plate. Let’s dive into the details of this delightful meal that’s perfect for cozy dinners and sure to impress.

Why You’ll Love This Recipe

  • Rich and Creamy Sauce: The creamy sauce, enriched by sun-dried tomatoes and Parmesan, creates a luxurious texture that clings to every piece of pasta.
  • Quick and Easy: With straightforward steps and minimal prep, you can whip this up in about 30 minutes, making it perfect for weeknight dinners.
  • Versatile Ingredients: This recipe can easily adapt to what you have on hand—substitute chicken for shrimp or even mushrooms for a vegetarian option.
  • Perfect for Sharing: Serve it family-style, bringing everyone together for a hearty meal that sparks conversation and connection.
  • Leftover Friendly: If you happen to have any leftovers, they reheat beautifully, making for delightful lunches or dinners later in the week.

Ingredient Breakdown

Before you don your apron and get cooking, let’s take a look at the essential ingredients that make up this lovely dish. Each component plays a vital role in creating the rich, comforting flavors that define Marry Me Chicken Pasta.

  • Chicken Breasts: 2 large boneless, skinless chicken breasts, sliced thinly for even cooking.
  • Salt and Pepper: Basic seasonings are essential for enhancing the natural flavors of the chicken.
  • Olive Oil: Used for searing the chicken to golden perfection and adding a touch of richness.
  • Garlic: 3 cloves, minced—because garlic makes everything better!
  • Sun-Dried Tomatoes: 1/3 cup, chopped; they add a delightful tangy sweetness that pairs beautifully with the creamy sauce.
  • Chicken Broth: 1/2 cup, adds depth to the sauce and keeps it from being too heavy.
  • Heavy Cream: 1 cup, the secret to that luscious, rich creamy sauce.
  • Parmesan Cheese: 1/2 cup, freshly grated for the best flavor and texture.
  • Italian Seasoning: 1 tsp, a blend of herbs that enhances the dish’s overall flavor profile.
  • Crushed Red Pepper Flakes: 1/2 tsp (optional), for those who enjoy a bit of heat.
  • Pasta: 8 oz, choose from penne, rigatoni, or fettuccine—each brings its own charm to the dish.
  • Fresh Basil: For garnish, adding a pop of color and freshness to the dish.

Step-by-Step Cooking Instructions

Juicy chicken and pasta dish garnished with fresh basil in a vibrant presentation.

Ready to bring this dish to life? Follow these step-by-step instructions to create a meal that’s bound to spark joy and maybe even a proposal!

  1. Boil the pasta according to package instructions until al dente. Reserve 1/2 cup of pasta water, then drain and set aside.
  2. In a large skillet over medium-high heat, add olive oil. Season the chicken with salt and pepper and add it to the skillet. Cook for 5-6 minutes until golden brown and cooked through. Remove and set aside.
  3. In the same skillet, add minced garlic and sauté for 1 minute until fragrant.
  4. Add sun-dried tomatoes and chicken broth to the skillet, scraping any browned bits from the pan. Bring to a simmer.
  5. Stir in the heavy cream and let it cook for another 2-3 minutes until slightly thickened. Add Italian seasoning and crushed red pepper flakes if using.
  6. Gradually add the grated Parmesan cheese, stirring until melted and well combined.
  7. Add the cooked chicken and drained pasta to the sauce, tossing to coat everything evenly. If the sauce is too thick, gradually add reserved pasta water until the desired consistency is reached.
  8. Plate the dish and top with fresh basil for an aromatic finish.

Pro Tips for Perfecting Your Dish

  • Don’t Overcrowd the Pan: Sear the chicken in batches if necessary to ensure even cooking and a golden crust.
  • Use Fresh Ingredients: Fresh garlic and high-quality Parmesan will elevate the flavors of your dish.
  • Adjust the Heat: Feel free to tweak the amount of crushed red pepper to suit your taste; you can always add more if you like it spicy!
  • Let it Rest: Allow the dish to sit for a few minutes after cooking to let the flavors meld together.
  • Experiment with Pasta Shapes: Different pasta shapes will hold the sauce differently; choose what you love!
  • Make it Ahead: You can prepare the sauce in advance and cook the pasta fresh right before serving.
  • Garnish Generously: Fresh basil adds not just flavor but a beautiful presentation.
  • Pair with Wine: A nice white wine can complement the dish beautifully, enhancing the overall experience.

Common Mistakes and Troubleshooting

Even the best cooks can occasionally run into issues. Here are some common pitfalls and how to avoid them:

  • Sauce Too Thick?: Add a splash of pasta water to loosen it up without compromising flavor.
  • Chicken Not Cooking Through?: Ensure your skillet is hot enough and consider using a meat thermometer; chicken should reach an internal temperature of 165°F.
  • Flavor Lacking?: Always taste and adjust seasoning as needed with salt, pepper, or more Italian seasoning.
  • Clumpy Sauce?: Stir continuously while adding cheese to ensure it melts smoothly into the sauce.

Delicious Variations to Try

Want to shake things up? Here are some variations of this comforting dish:

  • Shrimp Marry Me Pasta: Substitute shrimp for chicken for a seafood twist that’s just as delightful.
  • Mushroom Marry Me Pasta: For a vegetarian option, use sautéed mushrooms in place of chicken.
  • Spinach and Artichoke: Add fresh spinach and artichoke hearts for a flavorful, hearty addition.
  • Buffalo Chicken Style: Toss in some buffalo sauce for a spicy kick that will have your taste buds dancing!

Storage and Make-Ahead Instructions

If you find yourself with leftovers (which is rare, but it happens!), here’s how to store and reheat your Marry Me Chicken Pasta:

  • Refrigeration: Store in an airtight container in the fridge for up to 3 days.
  • Freezing: For longer storage, freeze in portions for up to 2 months. Thaw overnight in the fridge before reheating.
  • Reheating: Gently reheat on the stove over medium heat, adding a splash of chicken broth or water to prevent drying out.

Frequently Asked Questions

Here are some common questions about making Marry Me Chicken Pasta:

  • Can I make this dish gluten-free? Absolutely! Use gluten-free pasta to make it suitable for gluten-sensitive diets.
  • What sides go well with this meal? A simple green salad or garlic bread complements the dish beautifully.
  • Is this a one-pot meal? While the sauce and pasta can be made in one skillet, boiling pasta requires a separate pot.
  • Can I use different types of cheese? Yes! Feel free to experiment with other cheeses like mozzarella or goat cheese.
  • How can I add more vegetables? Toss in some sautéed zucchini, bell peppers, or peas for added nutrition and color.
  • What can I substitute for heavy cream? Half-and-half or a dairy-free cream alternative can be used, but the sauce may not be as rich.
  • Can I make it dairy-free? Use a dairy-free cream substitute and omit the cheese for a delicious dairy-free version.
  • How spicy is this dish? The spice level depends on the crushed red pepper flakes; you can adjust it to your preference!

Nutritional Tips and Dietary Adaptations

This Marry Me Chicken Pasta is not only comforting but can also be made to fit various dietary needs:

  • Low-Carb Option: Substitute pasta with zucchini noodles or cauliflower rice for a low-carb meal.
  • Heart-Healthy Adaptation: Use skinless chicken thighs and reduce the cream for a lighter version.
  • Low-Calorie Version: Opt for low-fat cream and reduce the amount of cheese used.
  • High-Protein Twist: Add chickpeas or lentils to boost the protein content without adding meat.

Essential Kitchen Equipment

Here’s what you’ll need to make this delightful dish:

  • Large Skillet: For sautéing chicken and making the sauce.
  • Pot for Boiling Pasta: A large pot to cook your chosen pasta.
  • Wooden Spoon: For stirring and scraping up those delicious browned bits from the skillet.
  • Meat Thermometer: To ensure your chicken is cooked perfectly every time.

Final Thoughts

Marry Me Chicken Pasta is more than just a recipe; it’s a celebration of love, warmth, and togetherness. Whether it’s a special occasion or just an ordinary weeknight, this dish is versatile enough to fit any gathering. With its rich flavors, creamy sauce, and comforting pasta, it’s sure to become a staple in your kitchen. So, gather your loved ones, pour a glass of wine, and enjoy the magic that happens when you share a meal made with care and love.

Marry Me Chicken Pasta

Prep Time 10 minutes
Cook Time 20 minutes
Total Time 30 minutes
Servings 4 servings
Calories 650
A creamy, flavorful chicken pasta dish with sun-dried tomatoes and Italian seasoning, perfect for a romantic dinner.

Ingredients

Protein

  • 2 large boneless, skinless chicken breasts, sliced thinly
  • 2 tbsp olive oil (for searing)
  • 3 cloves garlic, minced
  • 1/3 cup sun-dried tomatoes, chopped
  • 1/2 cup chicken broth
  • 1 cup heavy cream
  • 1/2 cup Parmesan cheese, grated
  • 1 tsp Italian seasoning
  • 1/2 tsp crushed red pepper flakes (optional)
  • 8 oz pasta (penne, rigatoni, or fettuccine)
  • Fresh basil, for garnish

Instructions 

  • Cook pasta until al dente, reserve 1/2 cup pasta water, then drain.
  • Sear seasoned chicken in olive oil until golden and cooked through, then set aside.
  • Sauté garlic in the same skillet, then add sun-dried tomatoes and chicken broth, simmer.
  • Stir in heavy cream, Italian seasoning, red pepper flakes, then add Parmesan cheese until melted.
  • Add cooked chicken and pasta, toss, and adjust sauce consistency with reserved pasta water.
  • Serve topped with fresh basil.

Notes

Use fresh basil for the best flavor and adjust red pepper flakes to taste.
Calories: 650kcal
Cost: $15
Course: Main Course
Cuisine: Italian
Keyword: chicken, creamy, Pasta

Welcome to the Heart of Southern Fried Chicken Tenders

There’s something undeniably comforting about a plate of perfectly fried chicken tenders. Whether it’s the crunch of the golden breading or the tenderness of the chicken inside, these little morsels have a way of bringing people together. Today, I’m excited to share my cherished recipe for Classic Southern Fried Chicken Tenders. This dish isn’t just about food; it’s about memories, family gatherings, and the love that goes into cooking. So, roll up your sleeves and let’s dive into this hearty recipe that’s sure to become a staple in your home!

Why You’ll Love This Recipe

Here are five reasons why this Southern Fried Chicken Tenders recipe will steal your heart:

  • Flavorful Marinade: Soaking the chicken in buttermilk creates tenderness and infuses rich flavor throughout each tenderloin.
  • Perfectly Crispy Coating: The seasoned flour mixture gives a crunchy exterior that locks in moisture, ensuring every bite is delectable.
  • Easy to Make: With just a few simple ingredients and straightforward steps, anyone can whip up these tenders in no time.
  • Versatile Serving Options: Enjoy them as a main dish, in a sandwich, or as a snack with your favorite dipping sauce.
  • Family-Friendly: Kids and adults alike will adore these chicken tenders, making them perfect for gatherings or a cozy family dinner.

Ingredients for Classic Southern Fried Chicken Tenders

Here’s what you need to create these irresistible chicken tenders:

  • Chicken tenderloins (about 1 pound): The star of the show, these are juicy and perfect for frying.
  • Buttermilk (1 cup): Essential for marinating, it enhances moisture and flavor.
  • All-purpose flour (1 cup): The base for our crispy coating.
  • Paprika (1 teaspoon): Adds a subtle smoky flavor that elevates the overall taste.
  • Salt (1 teaspoon): Essential for seasoning, use kosher salt for the best flavor.
  • Ground black pepper (1/2 teaspoon): A touch of spice that complements the chicken beautifully.
  • Vegetable oil (for frying): Choose a high smoke point oil for optimal frying.

Ingredient Substitutions

If you’re missing an ingredient, here are some substitutions:

  • Buttermilk: Make your own by adding 1 tablespoon of vinegar or lemon juice to 1 cup of milk. Let it sit for 10 minutes.
  • All-purpose flour: Whole wheat flour can be used for a healthier twist, though it may alter the texture slightly.
  • Paprika: Smoked paprika can add a deeper flavor if you prefer a smoky touch.

How to Make Southern Fried Chicken Tenders

Side view of perfectly fried chicken tenders on a plate, showcasing their texture.

Now, let’s get to the heart of the matter—how to cook these delightful tenders!

Step-by-Step Instructions

  1. Marinate the Chicken: In a bowl, allow the chicken tenderloins to soak in buttermilk for not less than 30 minutes and not longer than 1 hour. Keep in the refrigerator while marinating.
  2. Prepare the Flour Mixture: In another bowl, combine the flour, paprika, salt, and pepper. Mix well to ensure even seasoning.
  3. Heat the Oil: Pour about 2 inches of vegetable oil into a heavy skillet and heat to 350°F (175°C). A thermometer is handy to ensure the oil is at the right temperature.
  4. Coat the Chicken: Remove each marinated chicken tenderloin from the buttermilk, allowing excess to drip off before coating it entirely in the flour mixture.
  5. Fry the Tenders: Fry the chicken tenders in batches until they are golden brown, about 6-8 minutes. Make sure they achieve an internal temperature of 165°F (74°C) for safe consumption.
  6. Drain and Serve: Once fried, drain the tenders on paper towels to remove excess oil before serving.

Pro Tips for Perfect Chicken Tenders

To elevate your chicken tenders to the next level, keep these expert tips in mind:

  • Use a thermometer: Maintaining oil temperature at 350°F ensures optimal crispiness. Too hot, and the outside will burn; too cool, and you’ll end up with greasy tenders.
  • Don’t overcrowd the pan: Fry in batches to maintain oil temperature and achieve even cooking.
  • Let the chicken rest: Allow the chicken tenders to rest for a few minutes after frying to let the juices redistribute.
  • Experiment with spices: Feel free to add garlic powder, cayenne pepper, or other spices to the flour mixture for additional flavor.
  • Keep it fresh: Use fresh chicken tenderloins for the best flavor and texture.
  • Double-dip for extra crunch: For an even thicker crust, you can dip the chicken back into the buttermilk and then into the flour mixture again.
  • Consider an air fryer: For a healthier version, try making these tenders in an air fryer with a light spray of oil.
  • Pair with a sauce: Serve with honey mustard, ranch, or a spicy dipping sauce for added flavor.

Common Mistakes and Troubleshooting

Even the most seasoned cooks can run into hiccups. Here are a few common mistakes and how to avoid them:

  • Greasy tenders: If your tenders are coming out greasy, check the oil temperature and avoid overcrowding the pan.
  • Flour not sticking: Ensure the chicken is well-coated in buttermilk before dredging in the flour mixture.
  • Overcooked chicken: Keep an eye on the cooking time; use an instant-read thermometer for accuracy.
  • Soft breading: Allow the fried chicken tenders to rest on a wire rack instead of paper towels to keep the coating crispy.

Variations on Classic Southern Fried Chicken Tenders

Feel free to mix things up with these tasty variations:

  • Buffalo Chicken Tenders: Toss the cooked tenders in buffalo sauce for a spicy kick.
  • Honey Mustard Chicken Tenders: Drizzle honey mustard over the tenders before serving for a sweet and tangy flavor.
  • Parmesan Crusted Tenders: Add grated Parmesan cheese to the flour mixture for a cheesy twist.
  • Herb-Infused Tenders: Incorporate finely chopped fresh herbs like thyme or rosemary into the flour mixture for added aroma.

Storage and Make-Ahead Instructions

You can easily prepare these chicken tenders ahead of time:

  • Refrigerate: Store cooked chicken tenders in an airtight container in the refrigerator for up to 3 days.
  • Freeze: For longer storage, freeze the cooked tenders in a single layer on a baking sheet. Once frozen, transfer to a freezer bag for up to 3 months.
  • Reheat: Reheat in the oven at 375°F (190°C) until warmed through and crispy, about 10-15 minutes.

Frequently Asked Questions

Got questions? I’ve got answers!

  • Can I use chicken breasts instead of tenderloins? Yes, but they may require longer cooking time. Cut them into strips for even cooking.
  • What can I serve with chicken tenders? They pair wonderfully with coleslaw, mashed potatoes, or a fresh garden salad.
  • Can I bake these instead of frying? Yes, you can bake them at 400°F (200°C) for 20-25 minutes, flipping halfway, for a healthier option.
  • How do I know when the chicken is done? Use a meat thermometer to check that the internal temperature has reached 165°F (74°C).
  • What dipping sauces go well with these tenders? Honey mustard, ranch, barbecue, or buffalo sauce are all excellent choices!
  • Can I make these gluten-free? Absolutely! Use a gluten-free flour blend in place of all-purpose flour.
  • How spicy can I make these? Adjust the amount of seasoning in the flour mixture, or add hot sauce to the buttermilk for a spicier kick.
  • Why did my breading fall off? This can happen if the chicken isn’t wet enough when dredging in the flour, or if the oil isn’t hot enough.

Nutritional Tips and Dietary Adaptations

For those watching their dietary intake, consider these tips:

  • Lower Calorie Option: Use skinless chicken breasts and bake instead of fry.
  • Low-Carb Version: Substitute flour with almond flour or crushed pork rinds for a keto-friendly version.
  • Heart-Healthy Cooking: Use olive oil instead of vegetable oil for frying to increase healthy fats.

Equipment Recommendations

To make your cooking experience smoother, here’s a list of essential equipment:

  • Heavy skillet or cast-iron pan: Ideal for frying as it retains heat well.
  • Thermometer: An instant-read thermometer ensures perfect frying temperatures.
  • Slotted spoon or tongs: For safely flipping and removing chicken from hot oil.
  • Wire rack: To keep tenders crispy while they cool.

Serving Suggestions

Finally, here are some delightful ideas for serving your chicken tenders:

  • With a side of fries: Classic comfort food, perfect for a casual meal.
  • In a sandwich: Serve on a bun with lettuce, tomato, and your favorite sauce for a tasty lunch.
  • As an appetizer: Serve alongside a variety of dipping sauces for game day or gatherings.
  • On a salad: Slice tenders atop a fresh salad for a hearty, nutritious lunch.

Now that you have everything you need to make these Classic Southern Fried Chicken Tenders, it’s time to get cooking. Remember, the best meals are made with love and shared with those you cherish. So gather your family around the table, serve up a plate of these tenders, and create your own tender memories!

Classic Southern Fried Chicken Tenders

Prep Time 40 minutes
Cook Time 8 minutes
Total Time 48 minutes
Servings 4 servings
Calories 250
Enjoy crispy, golden chicken tenders with a flavorful coating, perfect for a comforting meal.

Ingredients

Protein

  • 1 pound Chicken tenderloins
  • 1 cup Buttermilk

Dry Mix

  • 1 cup All-purpose flour
  • 1 teaspoon Paprika
  • 1 teaspoon Salt
  • 0.5 teaspoon Ground black pepper

Frying Oil

  • for frying Vegetable oil (enough for 2 inches in skillet)

Instructions 

  • Marinate chicken in buttermilk for 30-60 minutes in the refrigerator.
  • Mix flour, paprika, salt, and pepper in a bowl.
  • Heat oil in a skillet to 350°F (175°C).
  • Coat chicken in flour mixture and fry until golden, about 6-8 minutes. Drain on paper towels.

Notes

Ensure oil reaches proper temperature for crispy tenders.
Calories: 250kcal
Cost: $15
Course: Main Course
Cuisine: Southern
Keyword: chicken

Discover the Joy of Chicken Shawarma

Have you ever tasted a dish that feels like home, transporting you to sun-kissed Middle Eastern streets filled with the aroma of spices and grilled meats? Chicken Shawarma is one such dish, where tender marinated chicken thighs are grilled to perfection and served with a creamy garlic sauce, fresh veggies, and warm pita bread. In this article, you’ll learn how to make this delightful dish from scratch, ensuring it’s as comforting and delicious as the recipe passed down through generations.

Why You’ll Love This Recipe

Every dish has its charm, but Chicken Shawarma holds a special place in our hearts for several reasons:

  • Flavor Explosion: The blend of spices—cumin, coriander, and smoked paprika—creates a rich flavor that dances on your palate.
  • Hearty and Satisfying: Using boneless, skinless chicken thighs ensures a juicy bite every time, making it a perfect meal for family gatherings or cozy dinners.
  • Quick and Easy: With just a few ingredients and simple steps, you can whip up a restaurant-quality meal in under an hour.
  • Customizable: You can adjust the toppings and sauces to suit your family’s tastes, making it a versatile dish for everyone.
  • Perfect for Meal Prep: Leftovers taste even better the next day, making it an ideal candidate for meal prepping.

Key Ingredients in Chicken Shawarma

Understanding the ingredients is crucial for mastering Chicken Shawarma. Here’s what you’ll need:

  • Boneless, skinless chicken thighs: These provide the best flavor and tenderness. If you prefer, chicken breasts can also be used, but they may turn out drier.
  • Plain yogurt: Acts as a tenderizer and adds creaminess to the marinade.
  • Olive oil: Helps in creating a flavorful coating that locks in moisture.
  • Lemon juice: Essential for adding a zesty brightness to the dish.
  • Minced garlic: Infuses the marinade with aromatic flavor.
  • Spices: Ground cumin, coriander, smoked paprika, allspice, and turmeric come together to create a fragrant blend that is essential to the shawarma experience.
  • Salt and pepper: Simple seasonings that enhance all the flavors.
  • Pita or flatbread: Perfect for wrapping the chicken and toppings together.
  • Fresh veggies: Sliced cucumbers, tomatoes, and red onion add crunch and freshness.
  • Creamy Garlic Sauce: Made with mayonnaise, lemon juice, and garlic, this sauce elevates the dish to new heights.

How to Make Chicken Shawarma

Side view of delectable Chicken Shawarma with fresh vegetables and creamy sauce.

Now that you know the key ingredients, let’s get into the step-by-step process of making Chicken Shawarma:

  1. In a large bowl, combine the following to create the marinade:

    • 1/4 cup plain yogurt
    • 1/4 cup olive oil
    • 2 tablespoons lemon juice
    • 4 cloves minced garlic
    • 1 teaspoon ground cumin
    • 1 teaspoon ground coriander
    • 1 teaspoon smoked paprika
    • 1/2 teaspoon ground allspice
    • 1/2 teaspoon turmeric
    • Salt and pepper, to taste
  2. Add 2 lbs of boneless, skinless chicken thighs to the marinade, ensuring they are well coated. Cover the bowl and refrigerate for at least 1 hour, preferably overnight for best flavor.

  3. Preheat your grill or oven to medium-high heat. If using the oven, set it to 400°F (200°C).

  4. Grill the marinated chicken thighs for about 5-7 minutes on each side until golden brown and cooked through. If using the oven, place the chicken on a baking sheet and bake for 20-25 minutes, turning halfway.

  5. While the chicken is cooking, prepare the creamy garlic sauce. In a small bowl, combine:

    • 1 cup mayonnaise
    • 2 tablespoons lemon juice
    • 4 cloves minced garlic
    • Salt and pepper, to taste

    Mix until smooth and refrigerate until ready to serve.

  6. Once the chicken is cooked, slice it thinly.

  7. Serve the chicken on warmed pita or flatbread, topped with cucumbers, tomatoes, red onion, and a drizzle of creamy garlic sauce.

  8. Garnish with chopped fresh parsley before serving for a pop of color and taste.

Pro Tips for Perfect Chicken Shawarma

To ensure your Chicken Shawarma turns out perfectly, consider these expert insights:

  • Marinate Longer: For maximum flavor, let the chicken marinate overnight.
  • Use a Meat Thermometer: Ensure your chicken reaches an internal temperature of 165°F (75°C) for safe consumption.
  • Don’t Overcrowd the Grill: Allow space between chicken pieces for even cooking.
  • Rest the Chicken: Let the chicken rest for a few minutes after cooking to retain its juices.
  • Experiment with Spices: Feel free to add your favorite spices or adjust the amounts to suit your taste.
  • Serve with Fresh Herbs: A sprinkle of fresh herbs like mint or cilantro can elevate the dish.
  • Consider a Side of Hummus: Hummus pairs perfectly with Shawarma and adds creaminess.
  • Warm Your Pita: Lightly toast your pita before serving for a delightful texture.

Common Mistakes and Troubleshooting

Here are some common pitfalls and how to avoid them:

  • Overcooking the Chicken: Keep a close eye on cooking time to prevent dryness.
  • Insufficient Marination: A rushed marinade can lead to bland chicken; take your time!
  • Skipping the Garlic Sauce: This dish is incomplete without the creamy garlic sauce; don’t skip it!
  • Wrong Chicken Cut: Using chicken breast can lead to a dry texture; stick with thighs for juiciness.

Delicious Variations of Chicken Shawarma

If you want to switch things up, here are some tasty variations to try:

  • Spicy Shawarma: Add cayenne pepper or chili powder to the marinade for a kick.
  • Vegetarian Shawarma: Substitute chicken with marinated grilled vegetables like bell peppers, zucchini, and mushrooms.
  • Shawarma Bowls: Serve the chicken over a bed of rice or quinoa with all the toppings.
  • Shawarma Wraps: Use tortillas instead of pita for a fun twist on the traditional wrap.

Storage and Make-Ahead Instructions

If you’re planning to enjoy Chicken Shawarma later, here’s how to store it:

  • Refrigeration: Store the cooked chicken in an airtight container for up to 3 days.
  • Freezing: You can freeze the cooked chicken for up to 3 months. Thaw in the refrigerator before reheating.
  • Make-Ahead: Prepare the marinade and marinate the chicken overnight for a flavor boost when you’re ready to cook.

Frequently Asked Questions

Here are some common questions about Chicken Shawarma:

  • Can I use chicken breasts instead of thighs? Yes, but thighs are recommended for juiciness.
  • What can I substitute for yogurt? You can use sour cream or a dairy-free alternative like coconut yogurt.
  • How spicy is this recipe? The recipe is mild; adjust spices to your preference for heat.
  • Can I grill the chicken in winter? Absolutely! You can use a grill pan on the stove or bake in the oven.
  • Is Shawarma gluten-free? Use gluten-free pita or serve it as a salad for a gluten-free option.
  • What sides go well with Shawarma? Hummus, tabbouleh, or a simple green salad pair wonderfully.
  • Can I make the garlic sauce in advance? Yes, it can be made up to a week ahead and stored in the refrigerator.
  • How do I know when the chicken is done? Use a meat thermometer to check for an internal temperature of 165°F (75°C).

Nutrition Tips and Dietary Adaptations

For those watching their dietary intake, here are some tips:

  • Lowering Calories: Substitute mayonnaise in the garlic sauce with Greek yogurt for a lighter option.
  • Heart-Healthy Option: Use olive oil and fresh veggies to promote heart health.
  • Low-Carb Version: Serve in lettuce wraps instead of pita for a low-carb meal.
  • Protein Boost: Add chickpeas to the wrap for extra protein and fiber.

Equipment Recommendations

Here are some kitchen tools that can help:

  • Grill or Grill Pan: Essential for achieving that beautiful char on the chicken.
  • Baking Sheet: Use for oven-baking the chicken if you don’t have a grill.
  • Mixing Bowl: A large bowl is necessary for mixing the marinade and chicken.
  • Meat Thermometer: Ensures your chicken is cooked perfectly every time.

Serving Suggestions

To elevate your Chicken Shawarma experience, consider these serving ideas:

  • Pair with Fresh Salads: A simple cucumber and tomato salad adds brightness.
  • Offer Various Sauces: Consider tahini sauce or spicy harissa for added flavor.
  • Garnish with Pickles: Pickled vegetables enhance the dish with tanginess.
  • Serve with Rice or Couscous: For a heartier meal, pair with rice or couscous.

Final Thoughts

Making Chicken Shawarma at home is not just about creating a meal; it’s about sharing love and tradition around the dinner table. With juicy chicken, aromatic spices, and a creamy garlic sauce, every bite is a reminder of family, comfort, and the joy of cooking. So gather your loved ones, roll up your sleeves, and let this recipe bring warmth not just to your plates, but to your hearts as well.

Chicken Shawarma with Creamy Garlic Sauce

Prep Time 15 minutes
Cook Time 30 minutes
Total Time 45 minutes
Servings 4 servings
Calories 550
A flavorful Middle Eastern-inspired dish featuring marinated chicken served with a creamy garlic sauce and fresh vegetables.

Ingredients

Marinade

  • 2 lbs boneless, skinless chicken thighs
  • 1/4 cup plain yogurt
  • 1/4 cup olive oil
  • 2 tablespoons lemon juice
  • 4 cloves minced garlic
  • 1 teaspoon ground cumin
  • 1 teaspoon ground coriander
  • 1 teaspoon smoked paprika
  • 1/2 teaspoon ground allspice
  • 1/2 teaspoon turmeric
  • to taste Salt and pepper Salt and pepper

Serving

  • Pita bread or flatbread (for serving)
  • Sliced cucumbers, tomatoes, and red onion (for serving)
  • Chopped fresh parsley (for garnish)

Creamy Garlic Sauce

  • 1 cup mayonnaise
  • 2 tablespoons lemon juice
  • 4 cloves minced garlic
  • to taste Salt and pepper Salt and pepper

Instructions 

  • Mix yogurt, olive oil, lemon juice, garlic, cumin, coriander, paprika, allspice, turmeric, salt, and pepper to make marinade.
  • Add chicken to marinade, refrigerate for at least 1 hour.
  • Preheat grill or oven to medium-high (400°F/200°C). Cook chicken 5-7 minutes per side on grill or bake for 20-25 minutes.
  • Prepare garlic sauce by mixing mayonnaise, lemon juice, garlic, salt, and pepper. Refrigerate until serving.
  • Slice cooked chicken thinly, serve with bread, vegetables, and garlic sauce. Garnish with parsley.

Notes

Marinate the chicken overnight for maximum flavor and tenderness.
Calories: 550kcal
Cost: $15
Course: Main Course
Cuisine: Middle Eastern
Keyword: chicken