Author

Tom

Browsing

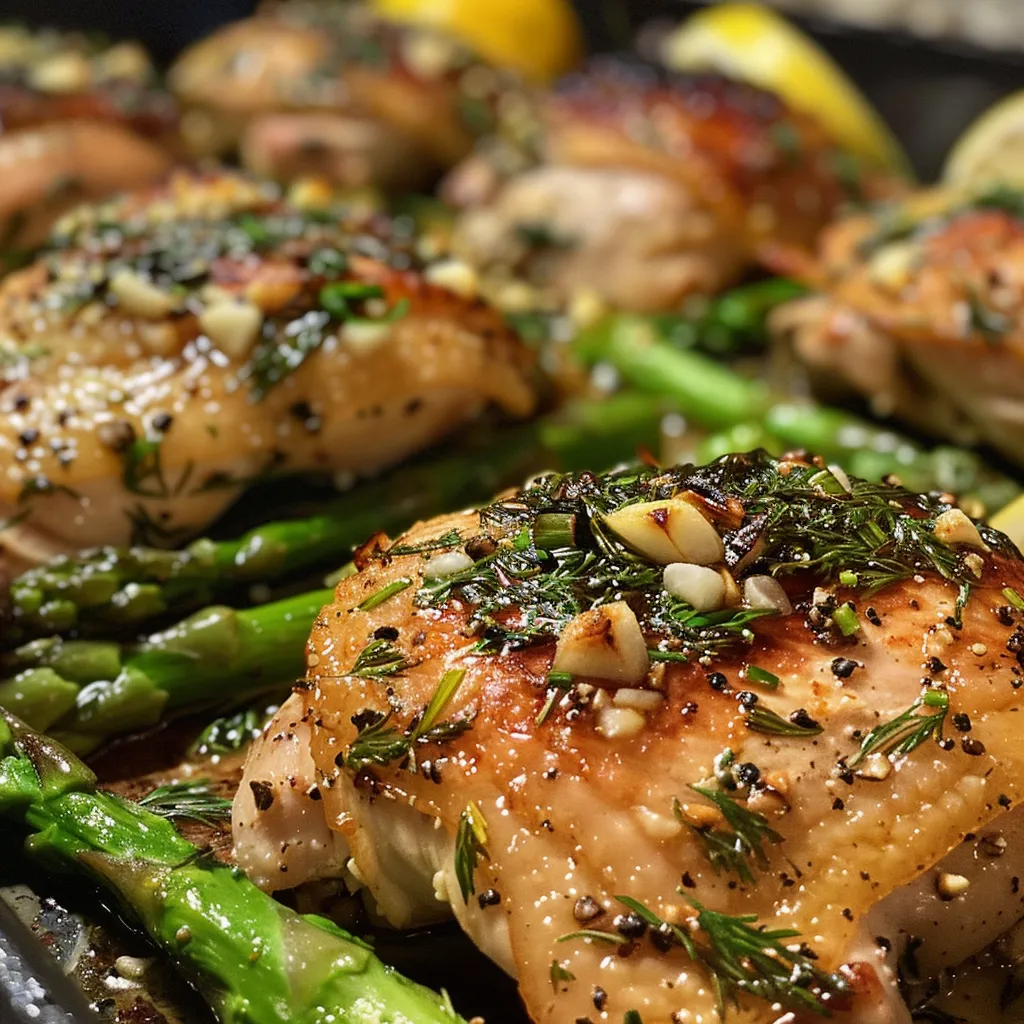
There’s a unique magic that happens when you blend sweet honey with zesty lemon, especially when it all comes together on the humble chicken thigh. This recipe for Honey Lemon Pepper Chicken Thighs is not just a meal; it’s a heartwarming dish that takes you back to family gatherings, where laughter and love fill the air. If you’re looking for a dish that’s as comforting as it is delicious, you’ve landed on the right recipe. Let’s dive into the details and discover why this dish will become a staple in your kitchen.

Why You’ll Love This Recipe

When it comes to preparing a meal that brings everyone together, this recipe for honey lemon pepper chicken thighs stands out for several reasons:

  • Unforgettable Flavor: The combination of sweet honey and zesty lemon creates a balanced flavor profile that’s both comforting and refreshing. You’ll find that this dish is a symphony of tastes that dances on your palate.
  • Simple Ingredients: Made with everyday ingredients you likely already have in your pantry, this recipe proves that delicious meals don’t have to be complicated.
  • Quick Preparation: With minimal prep time and straightforward steps, you can have a scrumptious dinner ready in less than an hour, making it perfect for busy weeknights.
  • Versatile Cooking Methods: Whether you prefer using an oven, air fryer, or stovetop, this recipe can adapt to your cooking style, ensuring you get tender, juicy chicken every time.
  • Perfect for Any Occasion: From casual family dinners to special gatherings, these honey lemon pepper chicken thighs are sure to impress your guests and create lasting memories.

Ingredients You’ll Need

Before we get started, let’s gather the ingredients. This recipe calls for:

  • 8 chicken thighs: Skin-on or skinless, bone-in or boneless, whichever you prefer.
  • Zest of 2 lemons: This adds a vibrant citrus flavor that enhances the dish.
  • 2 lemons: Juice from one and slices from the other for added flavor.
  • 3 tbsp honey: The sweet star of the show!
  • 2 tbsp olive oil: For cooking and added richness.
  • 1 tsp salt: Essential for seasoning.
  • 1 tsp black pepper (freshly ground): To add a touch of heat.
  • 1 tsp red chili flakes: Optional, but they add a nice kick.
  • ½ tsp paprika: For color and a hint of smokiness.
  • ½ tsp garlic powder: A must for flavor depth.
  • ½ tsp mustard powder: Adds a subtle tang and complexity.

Pro Tips for Making Honey Lemon Pepper Chicken Thighs

Now that you’ve got your ingredients, let’s ensure you make the most of this recipe. Here are some expert insights:

  • Marinate for Maximum Flavor: If time allows, marinate the chicken thighs for at least 30 minutes, or overnight for the best flavor infusion.
  • Use Fresh Ingredients: Fresh lemons and high-quality honey will elevate your dish significantly, adding brightness and sweetness.
  • Adjust Spice Levels: If you prefer a milder flavor, reduce the amount of red chili flakes. Conversely, add more for a spicier kick!
  • Cooking Options: Whether you bake, grill, or air fry, ensure you check the internal temperature of the chicken, which should reach 165°F for safe consumption.
  • Let it Rest: Allow the chicken to rest for a few minutes after cooking. This helps retain its juices and keeps it tender.
  • Experiment with Herbs: Consider adding fresh herbs like thyme or rosemary for an aromatic twist.
  • Presentation Matters: Serve your chicken thighs garnished with fresh parsley or lemon slices for a pop of color.
  • Pair with Seasonal Sides: Think roasted vegetables or a fresh salad to complement the dish and create a balanced meal.

Common Mistakes and Troubleshooting

Close-up side view of chicken thighs garnished with lemon slices.

Even seasoned cooks can encounter challenges. Here’s how to avoid some common pitfalls:

  • Overcooking the Chicken: Keep a close eye on cooking times. Overcooked chicken can become dry. A meat thermometer is your best friend here.
  • Skipping the Marinade: Don’t rush this step! Marinating enhances the chicken’s flavor and tenderness.
  • Neglecting to Adjust Seasoning: Always taste your sauce before cooking. Adjust salt, honey, or spices to your liking.
  • Not Using Fresh Ingredients: Fresh garlic and lemons make a noticeable difference in flavor. Avoid dried or bottled substitutes when possible.

Variations of Honey Lemon Pepper Chicken Thighs

Feeling adventurous? Here are some variations to try:

  • Honey Lemon Garlic Chicken: Add minced fresh garlic to the marinade for an extra punch of flavor.
  • Spicy Honey Lemon Chicken: Incorporate sriracha or your favorite hot sauce into the marinade for a spicy twist.
  • Herb-Infused Chicken: Mix in fresh herbs like rosemary or thyme for an aromatic flavor boost.
  • Honey Lemon Chicken Stir-Fry: Cut the chicken into bite-sized pieces and stir-fry with vegetables for a quick and healthy meal.

Storage and Make-Ahead Instructions

This recipe is perfect for meal prep! Here’s how to store and reheat:

  • Refrigerating: Store leftovers in an airtight container in the fridge for up to 3 days.
  • Freezing: For longer storage, freeze the cooked chicken in a freezer-safe bag for up to 3 months.
  • Reheating: Reheat in the oven at 350°F until warmed through, or microwave for a quick option.

Frequently Asked Questions

Here are some common questions about this delicious recipe:

  • Can I use chicken breasts instead of thighs? Yes, but chicken breasts may require a shorter cooking time to prevent drying out.
  • Is it necessary to marinate the chicken? While it’s not strictly necessary, marinating enhances the flavor and tenderness of the chicken.
  • Can I use bottled lemon juice? Freshly squeezed lemon juice is recommended for the best flavor, but bottled juice can be used in a pinch.
  • What sides pair well with honey lemon pepper chicken? Roasted vegetables, rice, or a fresh salad are great choices to complement the dish.
  • Can I make this recipe in advance? Yes, you can marinate the chicken thighs the night before for a quick dinner the next day.
  • How do I know when the chicken is done? The internal temperature should reach 165°F. Use a meat thermometer for accuracy.
  • Can I grill the chicken instead? Absolutely! Grilling adds a lovely char and flavor to the chicken.
  • What’s the best way to serve this dish? Serve hot, garnished with lemon slices and fresh herbs for a beautiful presentation.

Nutrition Tips and Dietary Adaptations

This recipe is not just delicious; it can fit various dietary needs. Here are some tips:

  • Low-Carb Option: Serve with a side of sautéed greens instead of rice to keep carbs low.
  • Gluten-Free: The recipe is naturally gluten-free, just ensure that any sauces used are certified gluten-free.
  • Dairy-Free: This recipe is dairy-free, making it suitable for those with lactose intolerance.
  • Protein-Packed: Chicken thighs provide a good source of protein, helping to keep you full and satisfied.

Recommended Equipment

Having the right tools can make a big difference. Here’s what I recommend:

  • Meat Thermometer: Essential for ensuring your chicken is cooked perfectly every time.
  • Sharp Knife: For easy slicing and preparation of your ingredients.
  • Mixing Bowls: For marinating your chicken and preparing the sauce.
  • Oven-Safe Dish or Air Fryer: Depending on your cooking method, having the right cookware will make your job easier.

Serving Suggestions

Finally, let’s talk about how to serve this delightful dish:

  • Family-style Platter: Serve the chicken thighs on a large platter with lemon slices and fresh herbs for a rustic look.
  • Individual Plates: Plate the chicken with a side of your choice for a more formal presentation.
  • Garnished with Fresh Herbs: A sprinkle of parsley or thyme adds a touch of elegance and freshness.
  • Pair with Seasonal Vegetables: Roasted or steamed greens complement the sweet and tangy chicken beautifully.

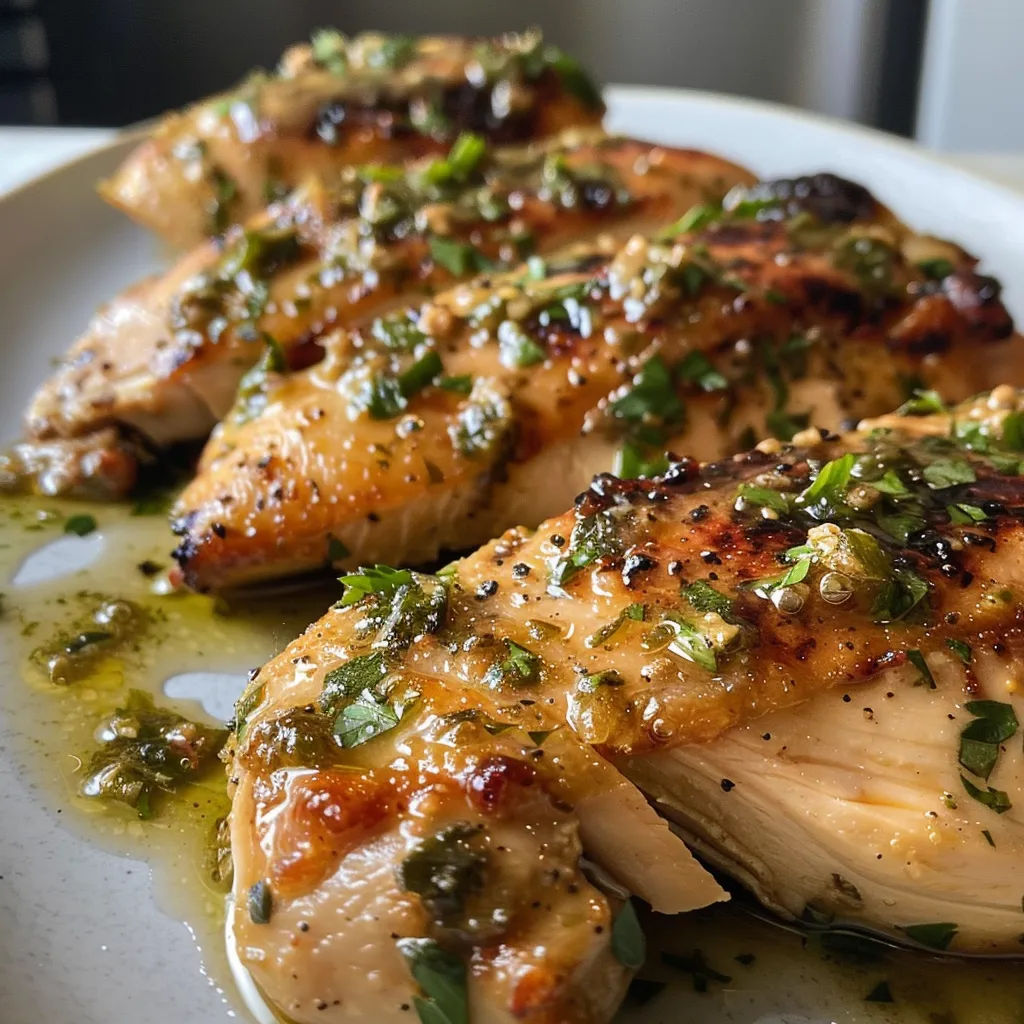
In conclusion, this recipe for Honey Lemon Pepper Chicken Thighs is more than just a meal; it’s an experience that brings families together around the dinner table. With its heartwarming flavors and comforting simplicity, it’s bound to spark joy at every gathering. So roll up your sleeves, gather your loved ones, and get ready to create some lasting memories over this delightful dish. Happy cooking!

Honey Lemon Pepper Chicken Thighs

Prep Time 10 minutes
Cook Time 25 minutes
Total Time 35 minutes
Servings 4 servings
Calories 350
Juicy chicken thighs are infused with bright lemon, sweet honey, and bold spices for a flavorful and easy meal.

Ingredients

Meat

  • 8 pieces chicken thighs
  • 2 pieces lemons (zest and slices) (zest of 2 lemons, 1 lemon juice, 1 lemon sliced)
  • 3 tbsp honey
  • 2 tbsp olive oil
  • 1 tsp salt
  • 1 tsp black pepper (freshly ground)
  • 1 tsp red chili flakes
  • ½ tsp paprika
  • ½ tsp garlic powder
  • ½ tsp mustard powder

Instructions 

  • Preheat oven to 400°F (200°C).
  • Mix lemon zest, juice of one lemon, honey, olive oil, salt, pepper, chili flakes, paprika, garlic powder, and mustard powder in a bowl.
  • Rub the mixture over the chicken thighs and place them in a baking dish.
  • Arrange lemon slices on top of the chicken.
  • Bake for 25 minutes or until chicken is cooked through and golden.

Notes

For extra flavor, marinate the chicken for 30 minutes before baking.
Calories: 350kcal
Cost: $12
Course: Main Course
Cuisine: American
Keyword: chicken, honey, Lemon

Welcome to the Heartwarming World of Sheet Pan Dinners

In the hustle and bustle of daily life, finding a dinner that’s not only delicious but also easy to prepare can sometimes feel like an uphill battle. That’s where the magic of a sheet pan dinner comes into play. This recipe for **Easy Chicken Sausage and Veggies Sheet Pan Dinner** is not just about the flavors; it’s about the memories you’ll create and the time you’ll save in the kitchen. Packed with wholesome ingredients and seasoned to perfection, this dish speaks to the heart of comfort food, reminding us that cooking can be simple, satisfying, and a way to gather loved ones around the table.

Why You’ll Love This Recipe

  • Quick & Convenient: With everything cooked on a single sheet pan, clean-up is a breeze, allowing you more time to enjoy the meal and less time scrubbing dishes.
  • Flavorful Combinations: The pairing of juicy chicken sausage with crisp veggies creates a delightful symphony of flavors that everyone will love.
  • Versatile Ingredients: You can easily swap out veggies or sausages based on what you have on hand, making this a flexible recipe for any season.
  • Meal Prep Friendly: This recipe is perfect for meal planning; make a large batch and enjoy leftovers throughout the week without sacrificing flavor.
  • Family-Friendly: It’s a hit with kids and adults alike, ensuring a stress-free family dinner that everyone will look forward to.

Ingredient Breakdown

Let’s dive into what you’ll need for this comforting dish, along with some recommended substitutions to suit your taste:

  • Chicken Sausage: Use pre-cooked chicken sausage for ease of preparation. You can substitute turkey or plant-based sausage for a lighter or vegetarian option.
  • Bell Peppers: Any color works here! Red, yellow, or green bell peppers add sweetness and crunch. Zucchini or asparagus are great alternatives if you want to mix it up.
  • Olive Oil: This adds richness; feel free to use avocado oil for a higher smoke point.
  • Seasonings: A blend of garlic powder, onion powder, and Italian seasoning brings warmth and depth. Customize with your favorite herbs!
  • Optional Ingredients: Consider adding sweet potatoes for a heartier dish, or toss in some cherry tomatoes for a burst of color and flavor.

Pro Tips for the Perfect Sheet Pan Dinner

Side view of a platter featuring an assortment of delicious comfort foods, emphasizing their appealing qualities.
  • Preheat Your Oven: Always preheat your oven to ensure even cooking. A hot oven helps to crisp up the veggies while keeping the chicken juicy.
  • Use Parchment Paper: Lining your sheet pan with parchment paper makes cleaning up easier and prevents sticking.
  • Don’t Overcrowd: Give your ingredients space on the pan to ensure they roast evenly and don’t steam.
  • Customize the Cook Time: Different veggies have different cook times. Add heartier vegetables like carrots earlier in the cooking process.
  • Rest Before Serving: Let the dish sit for a few minutes after removing it from the oven to allow the juices to redistribute.

Avoiding Common Mistakes

Even the best cooks make mistakes, so here are a few pitfalls to avoid:

  • Not Prepping Ingredients: Ensure all your ingredients are washed, chopped, and ready to go before you begin cooking to streamline the process.
  • Ignoring Seasoning: Don’t skip seasoning the veggies! A little salt and pepper go a long way in enhancing flavor.
  • Cooking at the Wrong Temperature: If the oven isn’t hot enough, your dish might turn out soggy rather than crisp. Make sure it’s preheated!

Variations to Try

If you’re feeling adventurous, here are a few variations to keep things fresh:

  • Spicy Kick: Add sliced jalapeños or a sprinkle of red pepper flakes for a bit of heat.
  • Sweet and Savory: Introduce some sliced apples or pears for a touch of sweetness along with your veggies.
  • Herb Infusion: Swap the Italian seasoning for fresh rosemary and thyme for a more aromatic profile.
  • Asian Twist: Use soy sauce and sesame oil, and replace the veggies with bok choy and snap peas for an Asian-inspired dinner.

Storage and Make-Ahead Instructions

Planning ahead? Here’s how to store and prepare your sheet pan dinner:

  • Storing Leftovers: Keep any leftovers in an airtight container in the fridge for up to 4 days.
  • Reheating: To reheat, place leftovers on a baking sheet in a preheated oven at 350°F (175°C) until heated through.
  • Make-Ahead Option: You can chop the veggies and sausage ahead of time and store them in the fridge for up to 2 days before cooking.

Frequently Asked Questions

  • Can I use raw chicken sausage? Yes, but ensure it’s cooked to an internal temperature of 165°F (74°C) for safety.
  • What are some good side dishes to serve? A fresh salad or crusty bread pairs wonderfully with this dish.
  • Can I freeze this meal? Yes, you can freeze it after cooking for up to 3 months. Just reheat it in the oven.
  • What veggies should I avoid? Avoid watery vegetables like cucumbers as they won’t roast well on a sheet pan.
  • How do I know when it’s done? The chicken should be browned and the veggies tender when forked.
  • Can I make this vegetarian? Absolutely! Just omit the sausage and add more vegetables or beans for protein.
  • Is this dish gluten-free? Yes, as long as the sausage used is gluten-free.
  • What kitchen equipment do I need? You’ll need a baking sheet, parchment paper, and some basic kitchen utensils for chopping and mixing.

Nutritional Tips and Dietary Adaptations

This meal is not only delicious but can also be tailored to fit various dietary needs:

  • Low-Carb Option: Skip the starchy veggies or potatoes to keep it low-carb.
  • High-Protein Variation: Add beans or chickpeas for an extra protein boost.
  • Vegan-Friendly: Use plant-based sausage and a variety of colorful vegetables to create a hearty vegan meal.

Equipment Recommendations

To make your cooking experience seamless, consider these essentials:

  • Quality Baking Sheet: A heavy-duty baking sheet helps distribute heat evenly.
  • Parchment Paper: Perfect for easy clean-up and preventing sticking.
  • Chef’s Knife: A sharp knife is essential for chopping your veggies efficiently.
  • Mixing Bowl: Use a large bowl for seasoning and tossing your ingredients.

Serving Suggestions

When it comes to serving, presentation matters. Here are a few ideas to elevate your dish:

  • Garnish with Fresh Herbs: A sprinkle of parsley or basil adds a pop of color and flavor!
  • Serve Family Style: Place the sheet pan directly on the table for a rustic, communal dining experience.
  • Add a Side Salad: A fresh garden salad can complement the heartiness of the dish.

In Closing

Cooking should be a joyful experience, not a chore. This **Easy Chicken Sausage and Veggies Sheet Pan Dinner** is more than just a meal; it’s a way to gather loved ones, share stories, and create lasting memories. So, roll up your sleeves, preheat that oven, and let’s make some magic happen in the kitchen. Enjoy the warmth and comfort that comes from a home-cooked meal, because at the end of the day, it’s all about the love we put into our cooking. Happy eating, friends!

Home

Prep Time 10 minutes
Cook Time 20 minutes
Total Time 30 minutes
Servings 4 people
Calories 450
A versatile and easy-to-make recipe perfect for quick meals and family gatherings.

Ingredients

Main Ingredients

  • 1 cup rice (uncooked)
  • 2 cups vegetables (mixed, chopped)
  • 1 lb chicken breast (diced)
  • 2 tbsp olive oil
  • to taste salt and pepper

Instructions 

  • Cook rice according to package instructions.
  • Heat olive oil in a pan over medium heat.
  • Add diced chicken and cook until browned.
  • Add vegetables and cook until tender.
  • Mix cooked rice into the pan, season with salt and pepper, and stir well.

Notes

Feel free to add your favorite spices for extra flavor.
Calories: 450kcal
Cost: $15
Course: Family Favorites
Keyword: Quick & Easy

Welcome to a Heartfelt Feast: Lemon and Dill Butter Garlic Chicken with Asparagus

Welcome, dear friends! Today, we’re diving into a dish that’s not just about cooking but about sharing warmth and comfort. This lemon and dill butter garlic chicken with asparagus is the perfect recipe to bring to your family table. With simple ingredients and a few easy steps, you’ll create a meal that’s bursting with flavor and nostalgia—just like the ones we enjoyed growing up in the South.

Why You’ll Love This Recipe

  • Quick and Easy: This dish comes together in under 30 minutes, making it perfect for busy weeknights or impromptu gatherings.
  • Bold Flavors: The combination of lemon, dill, and garlic elevates the chicken, creating a bright and savory experience.
  • Nutritious Ingredients: Packed with lean protein and fresh veggies, this dish not only satisfies but also nourishes your body.
  • Versatile Pairing: Serve it with rice, pasta, or a fresh salad, and you’ve got a meal that adapts to any occasion.
  • Family-Friendly: Kids and adults alike will love the comforting flavors, making it a hit for family dinners.

Ingredient Breakdown

Let’s take a closer look at the ingredients that make this dish sing. Each component plays a vital role, so let’s explore the flavors and potential substitutions:

  • 1 tablespoon oil: Use olive oil for a rich flavor or vegetable oil for a neutral taste.
  • 1 pound asparagus, trimmed: Feel free to swap with green beans or broccoli if asparagus isn’t in season.
  • 3 tablespoons butter: For a dairy-free option, substitute with vegan butter or olive oil.
  • 1 pound chicken, boneless and skinless, butterflied: Chicken thighs can be used for a juicier result.
  • Salt and pepper to taste: Always season to enhance the flavors of your dish.
  • 4 cloves garlic, chopped: Use garlic powder if fresh isn’t available, but fresh is always best!
  • 1 pinch red pepper flakes (optional): This adds a nice kick, so adjust to your spice preference.
  • 1/2 cup chicken broth: Use low-sodium broth to control salt levels.
  • 1 lemon, juice and zest (about 1/4 cup juice): Fresh lemon juice is crucial for brightness; bottled juice won’t do!
  • 1 tablespoon fresh dill, chopped (or 1 teaspoon dry dill): Fresh herbs make a world of difference, but dried can work in a pinch.

Step-By-Step Instructions for Lemon and Dill Butter Garlic Chicken

Side view of a plate featuring Lemon and Dill Butter Garlic Chicken and vibrant green asparagus.

Ready to cook? Follow these simple steps for a dish that’s full of heart:

  1. Heat the oil in a pan over medium-high heat and add the asparagus. Cook until tender, about 3-4 minutes, then set aside.
  2. Add the butter to the same pan. Once melted, place the butterflied chicken in, seasoned with salt and pepper, and cook until lightly golden brown on both sides, about 3-5 minutes per side.
  3. Add the chopped garlic and red pepper flakes, cooking until fragrant, around 1 minute.
  4. Pour in the chicken broth, bringing it to a boil. Reduce the heat and let it simmer for about 5 minutes.
  5. Finally, stir in the lemon juice and dill, and serve warm over your asparagus or your choice of side!

Expert Tips for Perfecting Your Dish

  • Don’t Rush the Chicken: Ensure the chicken is cooked through but remain tender. Use a meat thermometer; it should read 165°F.
  • Optimal Asparagus: Choose vibrant green asparagus for better flavor and texture.
  • Add Fresh Herbs: Fresh dill is key to bringing out the dish’s flavors—don’t skimp on it!
  • Adjust the Sauce: If you prefer a thicker sauce, let it simmer longer to reduce.
  • Prepping Ahead: Chop your garlic and trim your asparagus in advance for a quick cook time.
  • Flavor Boost: A splash of white wine can elevate the sauce even more.
  • Leftover Love: Use leftover chicken in salads or wraps the next day!
  • Pair It Right: Consider a light white wine, like a Sauvignon Blanc, to complement the lemony flavors.

Common Mistakes and Troubleshooting

Even the best of us can make a mistake in the kitchen! Here are some common pitfalls and how to avoid them:

  • Overcooking the Chicken: This leads to dry meat; use a meat thermometer for precise cooking.
  • Burnt Garlic: Add garlic towards the end of cooking to prevent burning and bitterness.
  • Too Much Salt: Use low-sodium broth and taste as you go to avoid over-seasoning.
  • Not Enough Sauce: If you prefer more sauce, simply add more chicken broth and adjust the seasonings!

Variations to Try

Feel like getting creative? Here are some delicious variations:

  • Herb Variations: Swap dill for tarragon or thyme for a different herbaceous flavor.
  • Vegetable Additions: Toss in bell peppers or zucchini for extra nutrition and color.
  • Creamy Twist: Add a splash of heavy cream for a richer sauce that coats the chicken beautifully.
  • Spicy Kick: Incorporate sriracha or hot sauce for a spicy version of this comfort dish.

Storage and Make-Ahead Instructions

Planning ahead? Here’s how to store and prepare this dish:

  • Storage: Store leftovers in an airtight container in the refrigerator for up to 3 days.
  • Freezing: You can freeze the cooked chicken and asparagus for up to 2 months. Just reheat gently to avoid drying out.
  • Make-Ahead: Prepare the chicken and sauce a day in advance, and simply heat it up when you’re ready to serve.

Comprehensive FAQ

Got questions? Here are some answers to common queries about this lovely dish:

  • Can I use frozen chicken? Yes, just make sure it’s thawed before cooking for even results.
  • What if I don’t have fresh dill? Dried dill works fine, but use only a third of the amount.
  • Is this dish gluten-free? Absolutely! All ingredients are naturally gluten-free.
  • Can I use other vegetables? Definitely! Broccoli, green beans, or even spinach would work beautifully.
  • How can I make this dish spicier? Add more red pepper flakes or a dash of your favorite hot sauce!
  • What should I serve with this dish? Pair with rice, quinoa, or a fresh salad for a complete meal.
  • Can I make this in advance? Yes, just keep the chicken and sauce separate until ready to heat and serve.
  • How do I know when the chicken is done? Use a meat thermometer; it should read 165°F when fully cooked.

Nutritional Tips and Dietary Adaptations

For those watching their diet, here are some key nutritional considerations:

  • Low-Calorie Option: Use skinless chicken breasts and limit the butter for a lighter version.
  • Low-Carb Version: Skip the pasta and serve over a bed of leafy greens instead.
  • High-Protein Twist: Add chickpeas or lentils for extra protein without adding meat.
  • Vegan Option: Replace chicken with tofu or tempeh and use olive oil instead of butter.

Equipment Recommendations

Having the right tools makes all the difference! Here are my top picks:

  • Sturdy Skillet: A heavy-bottomed skillet ensures even cooking and browning.
  • Meat Thermometer: Essential for checking chicken doneness without cutting into it.
  • Sharp Knife: A good chef’s knife makes prepping ingredients a breeze.
  • Cutting Board: Use a sturdy board for safety and ease while chopping.
  • Measuring Cups and Spoons: Precision is key for great results, so don’t skip these!

Serving Suggestions

Finally, let’s talk about how to present this dish:

  • Plate it Bright: Arrange the chicken and asparagus on a colorful platter for visual appeal.
  • Garnish: Sprinkle with extra dill or lemon zest for a fresh touch.
  • Pair with Sides: Consider serving alongside garlic bread or a light pasta salad.
  • Wine Pairing: A chilled Pinot Grigio or a crisp Sauvignon Blanc complements the flavors beautifully.

Conclusion

There you have it, friends! A heartwarming recipe for lemon and dill butter garlic chicken that not only fills your belly but also your soul. Whether it’s a family dinner or a quiet meal for one, this dish is sure to bring a smile to your face and warmth to your heart. Remember, cooking is about sharing love and joy, so gather your loved ones and enjoy this delightful creation straight from my kitchen to yours. Happy cooking!

Lemon and Dill Butter Garlic Chicken and Asparagus

Prep Time 10 minutes
Cook Time 20 minutes
Total Time 30 minutes
Servings 4 servings
Calories 450
A flavorful and easy-to-make chicken and asparagus dish infused with lemon, dill, and garlic, perfect for a quick dinner.

Ingredients

Oil

  • 1 tablespoon oil

Asparagus

  • 1 pound asparagus, trimmed

Butter

  • 3 tablespoons butter

Chicken

  • 1 pound chicken, boneless and skinless, butterflied
  • to taste salt and pepper

Garlic

  • 4 cloves garlic, chopped
  • 1 pinch red pepper flakes (optional)

Chicken Broth

  • 1/2 cup chicken broth

Lemon

  • 1 lemon lemon, juice and zest (about 1/4 cup juice)

Dill

  • 1 tablespoon fresh dill, chopped (or 1 teaspoon dry dill)

Instructions 

  • Heat oil in a pan, cook asparagus until tender, then set aside.
  • Melt butter, cook chicken until golden, about 3-5 minutes per side.
  • Add garlic and red pepper flakes, cook until fragrant, about 1 minute.
  • Pour in broth, boil, then simmer for 5 minutes. Add lemon juice and dill, serve.

Notes

Ensure not to overcook the chicken for best results.
Calories: 450kcal
Cost: $15
Course: Main Course
Cuisine: American
Keyword: Asparagus, chicken, Lemon

Welcome to a culinary journey that brings the heart of home cooking right into your kitchen! In this detailed guide, we’ll explore how to make a delightful Sweet and Sour Chicken that’s quick, easy, and bursting with flavor. Whether you’re looking for a comforting weeknight meal or a dish that will impress your guests, you’ve come to the right place. With tender chicken, vibrant veggies, and a tangy sauce, this recipe will surely bring everyone to the table.

Why You’ll Love This Recipe

This Sweet and Sour Chicken recipe isn’t just delicious; it comes with a host of benefits that make it a must-try:

  • Quick to Prepare: In under 30 minutes, you can whip up a homemade dish that rivals your favorite takeout.
  • Simple Ingredients: Using everyday items from your pantry, you’ll create a meal that feels special without a lot of fuss.
  • Customizable: Adjust the veggies or sauce to suit your palate, making it perfect for picky eaters or adventurous taste buds.
  • Perfect for Meal Prep: Make a big batch and store it for easy lunches or dinners throughout the week.
  • Family-Friendly: This dish is a hit with kids and adults alike, making it a go-to for family gatherings.

Ingredients Breakdown

Let’s gather our ingredients and get ready to cook! Here’s what you’ll need for this Sweet and Sour Chicken:

  • 1 lb skinless boneless chicken thighs (or chicken breast): Thighs add richness, but breasts work just as well if you prefer leaner meat.
  • 1 medium red bell pepper (or any color bell pepper): Adds sweetness and crunch; feel free to mix colors for a vibrant dish.
  • 1/2 cup pineapple (diced): Canned or fresh, pineapple brings the sweet element of this dish.
  • ½ onion (sliced): Yellow, white, or red onions can enhance the overall flavor.
  • ¼ cup cornstarch (or potato starch): This helps achieve that crispy coating on the chicken.
  • ⅓ cup vegetable oil (or any neutral oil): For frying the chicken to golden perfection.
  • 1 tsp salt: Essential for seasoning the chicken.
  • ½ tsp garlic powder (or 1 tsp minced garlic): A must for flavor depth.
  • 1/2 tsp sesame seeds (optional garnish): Adds a nutty flavor and lovely presentation.
  • 1 green onion (finely chopped for garnishing): Bright and fresh, it enhances the dish’s appeal.
  • 1/3 cup ketchup: Forms the base of your sauce, providing sweetness and tang.
  • 1/2 cup brown sugar (or white sugar): Balances the acidity in the sauce.
  • 1/4 cup white vinegar (or rice vinegar/apple cider vinegar): Adds the tangy element that makes this dish so memorable.
  • 2 tbsp water (cold): Used to adjust sauce consistency.
  • 1 tbsp regular soy sauce: Brings umami flavor to the dish.
  • 1 tbsp cornstarch (or potato starch): To thicken the sauce.

Cooking Instructions

Now that we have our ingredients ready, it’s time to cook! Follow these simple steps to create your Sweet and Sour Chicken:

  1. In a small bowl, combine the sauce ingredients as listed above and set aside.
  2. Dice the chicken thighs into 1.5-inch pieces and transfer them to a large bowl. Season the chicken with salt and garlic powder.
  3. Add cornstarch to the chicken and toss until each piece is evenly coated.
  4. Heat vegetable oil in a large pan over medium-high heat. Fry the chicken on each side for 4-6 minutes or until golden brown and crispy. Ensure the internal temperature reaches 165°F.
  5. Remove the fried chicken and place it on a wire rack or paper-towel lined plate while reserving 1 tsp of oil in the pan.
  6. Reduce the heat to medium and sauté onions, red bell pepper, and pineapple for 30-45 seconds.
  7. Pour in the sauce and let it simmer to thicken for about 30-60 seconds.
  8. Return the fried chicken to the pan, tossing it in the sauce to coat evenly. Remove from heat.
  9. Garnish with green onions and sesame seeds before serving. Enjoy your meal!

Pro Tips for Success

Side view of Sweet and Sour Chicken with a shiny glaze, garnished with sesame seeds and green onions.

To ensure your Sweet and Sour Chicken turns out perfectly, keep these expert tips in mind:

  • Use fresh ingredients: Fresh vegetables and chicken enhance flavor and texture, making a noticeable difference.
  • Don’t overcrowd the pan: Fry the chicken in batches, if necessary, to maintain the heat and ensure even cooking.
  • Control your heat: Adjust the heat as needed to avoid burning the sauce while ensuring it thickens properly.
  • Experiment with sauces: Try adding a splash of orange juice or soy sauce variations to customize the flavor to your liking.
  • Let it rest: Allow the chicken to rest for a few minutes before serving to let the juices settle.
  • Make it a meal: Serve over steamed rice or noodles for a complete dish that’s hearty and satisfying.
  • Try air frying: For a healthier option, consider air frying the chicken for a crispy texture with less oil.
  • Adjust sweetness: Feel free to modify the sugar content based on your taste preference.

Common Mistakes to Avoid

To help you navigate the kitchen with ease, here are some common pitfalls to avoid:

  • Not marinating: While this recipe is quick, marinating the chicken for an hour can deepen the flavor.
  • Using too much oil: Too much oil can make the dish greasy rather than crispy; just enough to coat the pan is ideal.
  • Skipping the cornstarch: This step is essential for achieving that crispy coating, so don’t skip it!
  • Overcooking the chicken: Keep an eye on cooking times to ensure your chicken stays juicy rather than dried out.

Delicious Variations

Feel free to get creative with your Sweet and Sour Chicken! Here are some tasty variations to try:

  • Sweet and Sour Shrimp: Swap out chicken for shrimp for a delightful seafood twist.
  • Vegetarian Option: Use tofu or a medley of vegetables like zucchini and mushrooms in place of chicken.
  • Pineapple Fried Rice: Serve the chicken over a bed of pineapple fried rice for a tropical flair.
  • Spicy Kick: Add red pepper flakes or sriracha to the sauce for an extra layer of heat.

Storage and Make-Ahead Instructions

This Sweet and Sour Chicken is great for meal prep! Here’s how to store it:

  • Refrigerate: Store leftovers in an airtight container in the fridge for up to 3 days.
  • Freeze: For longer storage, freeze the cooked chicken in a freezer-safe container for up to 3 months.
  • Reheat: To reheat, warm on the stovetop or microwave until heated through. You may need to add a splash of water or broth when reheating to keep it moist.

Frequently Asked Questions

Here are some common questions about making Sweet and Sour Chicken:

  • Can I use chicken breast instead of thighs? Yes, chicken breast is a great alternative and will work perfectly in this recipe.
  • What can I substitute for brown sugar? You can use white sugar or coconut sugar, but it may alter the flavor slightly.
  • Can I make this dish gluten-free? Absolutely! Use gluten-free soy sauce and cornstarch for a gluten-free version.
  • How do I make the sauce thicker? If you desire a thicker sauce, mix an extra tablespoon of cornstarch with water and add it to the pan while cooking.
  • What vegetables can I add? Feel free to add broccoli, snap peas, or carrots for extra nutrition and color.
  • Can I skip frying the chicken? Yes, you can bake or air fry the chicken for a healthier option.
  • Is this dish suitable for freezing? Yes, it freezes well; just ensure it’s in an airtight container.
  • How can I add more flavor? Consider marinating the chicken in soy sauce and ginger for an hour before cooking for extra depth of flavor.

Nutritional Tips and Dietary Adaptations

Want to make this dish even healthier? Here are some suggestions:

  • Lower the sugar: Reduce sugar to taste or use natural sweeteners like honey or agave.
  • Add more veggies: Incorporate additional vegetables to boost fiber and nutrients.
  • Choose leaner proteins: Chicken breast or plant-based proteins are excellent options for those looking to cut back on fat.

Equipment Recommendations

Having the right tools can make your cooking experience smoother:

  • Non-stick skillet or wok: Ideal for frying chicken without sticking.
  • Cutting board and chef’s knife: Essential for prepping your chicken and veggies.
  • Meat thermometer: To ensure your chicken is cooked to perfection.

Serving Suggestions

Complete your meal with some delightful serving ideas:

  • Serve over steamed rice: A classic pairing that soaks up the delicious sauce.
  • Pair with noodles: Lo mein or rice noodles complement the dish beautifully.
  • Add a side salad: A fresh green salad balances the richness of the chicken.

Conclusion

There you have it! A comprehensive guide to making Sweet and Sour Chicken that’s not just a meal, but a comforting taste of home. With simple ingredients, easy steps, and a wealth of variations, this recipe is sure to become a beloved staple in your kitchen. So gather your loved ones, pull up a chair, and enjoy the warmth and flavors of this comforting dish. Thank you for sharing this culinary adventure with me today—happy cooking!

Quick & Easy Sweet and Sour Chicken

Prep Time 10 minutes
Cook Time 20 minutes
Total Time 30 minutes
Servings 4 servings
Calories 450
A flavorful and quick dish combining crispy chicken with a tangy sweet and sour sauce, perfect for a weeknight dinner.

Ingredients

Protein

  • 1 lb skinless boneless chicken thighs (or chicken breast)
  • 1 medium red bell pepper (or green/yellow/orange)
  • 0.5 cup pineapple (diced)
  • 0.5 onion onion (sliced)
  • 0.25 cup cornstarch (or potato starch)
  • 0.33 cup vegetable oil (or any neutral oil)
  • 1 tsp salt
  • 0.5 tsp garlic powder (or 1 tsp minced garlic)
  • 0.5 tsp sesame seeds (optional garnish)
  • 1 green onion green onion (finely chopped for garnishing)
  • 0.33 cup ketchup
  • 0.5 cup brown sugar (or white sugar)
  • 0.25 cup white vinegar (or rice vinegar/apple cider vinegar)
  • 2 tbsp water (cold)
  • 1 tbsp soy sauce (regular)
  • 1 tbsp cornstarch (or potato starch)

Instructions 

  • Combine sauce ingredients in a small bowl and set aside.
  • Dice chicken into 1.5-inch pieces, season with salt and garlic powder, then coat with cornstarch.
  • Fry chicken in hot oil until golden and crispy, then drain on paper towels.
  • Sauté onions, bell pepper, and pineapple for 30-45 seconds, then add sauce and simmer to thicken.
  • Mix fried chicken into the sauce to coat, garnish with green onions and sesame seeds, then serve.

Notes

Ensure chicken is cooked to an internal temperature of 165°F for safety.
Calories: 450kcal
Cost: $15
Course: Main Course
Cuisine: Asian
Keyword: chicken

Discover the Comfort of Garlic Butter Chicken Bites

Welcome, dear friends! Today, we’re diving into a dish that warms the heart and fills the belly—Garlic Butter Chicken Bites. Picture tender morsels of chicken, sautéed in rich garlic butter, yielding a flavor that dances on your palate. This recipe is not just about cooking; it’s about creating memories around the table, sharing stories, and savoring the simple pleasures of life. Whether you’re whipping this up for a cozy weeknight dinner or serving it at your next gathering, you’ve got a recipe that’s bound to impress!

Why You’ll Love This Recipe

Before we roll up our sleeves, let’s talk about what makes these Garlic Butter Chicken Bites truly special. Here’s why this recipe should be at the top of your cooking list:

  • Quick and Easy: Ready in under 30 minutes, it’s perfect for busy weeknights.
  • Rich Flavor: The combination of garlic and butter creates a heavenly sauce that elevates simple chicken.
  • Versatile: Serve it over rice, pasta, or alongside fresh veggies for a complete meal.
  • Family-Friendly: Kids and adults alike can’t resist these savory bites!
  • Meal Prep Friendly: Make a big batch ahead of time; they store well in the fridge or freezer.

Ingredient Breakdown

Now, let’s gather our ingredients. Here’s what you’ll need to create these delightful bites:

  • 1¼ lb boneless skinless chicken breasts or thighs: Cut into bite-sized pieces. Thighs offer more flavor but breasts are leaner.
  • 1 teaspoon Italian seasoning: A perfect blend for some extra aroma. You can substitute with dried herbs like thyme or oregano.
  • ¼ teaspoon salt: Adjust according to your taste preference.
  • ¼ teaspoon freshly ground black pepper: Freshly ground gives the best flavor.
  • ⅛ teaspoon paprika: For a touch of color and smokiness.
  • 1 tablespoon olive oil: Helps prevent sticking and adds a lovely richness.
  • 3 tablespoons unsalted butter: Divided, for that rich garlic butter flavor.
  • 1½ tablespoons minced fresh garlic: About 4 cloves. The more garlic, the merrier!
  • 2 tablespoons finely chopped fresh parsley: For a fresh finish and a pop of color.

How to Make Garlic Butter Chicken Bites

Side view of golden-brown chicken bites in garlic butter sauce.

Ready to get cooking? Let’s transform these ingredients into a delicious meal!

  1. Preheat a large non-stick skillet over medium-high heat.
  2. Toss the chicken pieces in a bowl with the Italian seasoning, salt, pepper, and paprika until evenly coated.
  3. Add 1 tablespoon of olive oil and 1 tablespoon of butter to the skillet. Tilt the pan to coat it evenly.
  4. Place the chicken in a single layer in the skillet. Avoid crowding the pan to ensure they brown nicely.
  5. Cook until golden brown on the bottom, about 3 minutes. Flip the pieces and cook for an additional 2 minutes, or until nearly cooked through. You may need to do this in batches for optimal browning.
  6. Stir in the remaining butter, garlic, and parsley. Cook for another minute or until the chicken is fully cooked, scraping the bottom of the skillet to incorporate all those flavorful brown bits.
  7. Serve immediately, enjoying the aroma and warmth of freshly cooked chicken bites!

Pro Tips for Perfect Garlic Butter Chicken Bites

Here are some expert insights to ensure your chicken bites turn out perfect every time:

  • Choose the Right Chicken: Boneless skinless thighs retain moisture better than breasts, making them a great choice for a juicier bite.
  • Don’t Overcrowd the Pan: Cooking in batches allows for better browning and flavor development.
  • Adjust Garlic to Taste: If you’re not a huge garlic fan, start with less and add it gradually.
  • Use Fresh Herbs: Fresh parsley not only enhances flavor but also adds a lovely presentation.
  • Experiment with Seasonings: Try adding a pinch of red pepper flakes for a spicy kick!
  • Let It Rest: Allow the chicken to rest for a few minutes after cooking to keep it juicy.
  • Serve Hot: These bites are best enjoyed fresh off the skillet!
  • Save the Leftovers: They make a great addition to salads or wraps for lunch the next day!

Common Mistakes and Troubleshooting

Even the best of us can have a culinary mishap. Here are common mistakes to avoid:

  • Overcooking the Chicken: Watch the cooking time closely to prevent dry bites. They should be golden and juicy!
  • Using Too Much Butter: While butter adds flavor, too much can overwhelm the dish. Stick to the recipe!
  • Not Preheating the Pan: A hot pan is essential for a good sear. Always preheat before adding your ingredients.
  • Skipping the Scraping: Don’t forget to scrape the pan to incorporate those tasty bits into your sauce!

Variations to Try

Feel like mixing it up? Here are some variations you can try:

  • Honey Garlic Chicken Bites: Add 1 tablespoon of honey for a sweet twist that balances out the garlic.
  • Lemon Garlic Chicken Bites: Squeeze fresh lemon juice over the chicken before serving for a bright, zesty finish.
  • Asian-Inspired Bites: Substitute soy sauce for olive oil, and add sesame oil, ginger, and scallions for a completely different flavor profile.
  • Cheesy Garlic Chicken Bites: Sprinkle with parmesan cheese just before serving for a rich, cheesy topping.

Storage and Make-Ahead Instructions

Want to prepare ahead of time? Here’s how to store your chicken bites:

  • Refrigerate: Store in an airtight container for up to 3 days. Reheat in a skillet over low heat to maintain tenderness.
  • Freeze: Place cooled chicken bites in a freezer-safe container for up to 3 months. Thaw overnight in the fridge before reheating.
  • Make Ahead: You can prepare the chicken and season it up to 24 hours in advance. Just cook and serve when you’re ready!

Frequently Asked Questions

Got questions? Here are answers to some common queries:

  • Can I use chicken thighs instead of breasts? Absolutely! Thighs are more flavorful and stay moist.
  • What can I serve with Garlic Butter Chicken Bites? They go wonderfully with rice, pasta, or a fresh salad.
  • Can I use frozen chicken? Yes, but thaw it completely before cooking for even results.
  • How do I ensure my chicken stays juicy? Don’t overcook and let it rest before serving.
  • What if I don’t have Italian seasoning? Use a mix of dried basil, oregano, and thyme instead.
  • Can I make this recipe dairy-free? Substitute the butter with a plant-based alternative.
  • How long does it take to make? This recipe takes about 20-30 minutes from start to finish.
  • Is this recipe suitable for meal prep? Yes! It stores well and is great for lunches throughout the week.

Nutritional Tips and Dietary Adaptations

Let’s make this dish fit your dietary needs:

  • Low-Carb: Serve with sautéed zucchini noodles instead of rice or pasta.
  • Gluten-Free: Ensure seasoning blends are certified gluten-free.
  • High-Protein: Pair with a side of legumes or quinoa for an extra protein boost.

Equipment Recommendations

Here’s what you’ll need to make this dish:

  • Non-Stick Skillet: A good non-stick skillet is essential for easy cooking and cleanup.
  • Spatula: Use a spatula for flipping and stirring without damaging your skillet.
  • Measuring Spoons: For accurate seasoning – don’t skip this step!

Serving Suggestions

Finally, let’s talk about how to serve these delightful chicken bites:

  • With Pasta: Serve over spaghetti aglio e olio and add seared tomatoes for a lovely presentation.
  • On a Bed of Rice: A scoop of garlic butter chicken bites over fluffy rice makes for a comforting meal.
  • As Appetizers: Serve on toothpicks for a crowd-pleasing starter at your next gathering.

And there you have it! A heartwarming, delicious recipe that celebrates the simplicity and joy of home cooking. Remember, cooking is not just about feeding the body; it’s about nurturing the soul. So gather your loved ones, whip up these Garlic Butter Chicken Bites, and enjoy the moments that make life special. Happy cooking, friends!

Garlic Butter Chicken Bites

Prep Time 10 minutes
Cook Time 10 minutes
Total Time 20 minutes
Servings 4 servings
Calories 350
Juicy chicken bites cooked in garlic butter with herbs, perfect for a quick and flavorful meal.

Ingredients

Protein

  • 1.25 lb boneless skinless chicken breasts or thighs, cut into bite-sized pieces
  • 1 teaspoon Italian seasoning
  • 0.25 teaspoon Salt
  • 0.25 teaspoon freshly ground black pepper
  • 0.125 teaspoon paprika
  • 1 tablespoon olive oil
  • 3 tablespoons unsalted butter, divided
  • 1.5 Tablespoons minced fresh garlic (4 cloves)
  • 2 Tablespoons finely chopped fresh parsley

Instructions 

  • Preheat a skillet over medium-high heat.
  • Toss chicken with Italian seasoning, salt, pepper, and paprika.
  • Add 1 tbsp olive oil and 1 tbsp butter; cook chicken until golden, about 3 minutes per side.
  • Add remaining butter, garlic, and parsley; cook for 1 minute until fragrant.
  • Serve immediately garnished with parsley.

Notes

Ensure not to overcrowd the pan for even browning.
Calories: 350kcal
Cost: $12
Course: Main Course
Cuisine: American
Keyword: Butter, chicken, Garlic

The Heartwarming Chicken Casserole That Brings Families Together

When the air turns crisp and the leaves start to fall, there’s nothing quite like a hearty chicken casserole to warm both the home and the heart. This beloved dish, passed down through generations, is not just a meal; it’s a tradition, a memory, and a symbol of comfort. With simple ingredients and straightforward steps, you’ll find that making this chicken casserole is as easy as pie—no fancy techniques required. Let’s dive into the world of chicken casseroles and discover why this dish has earned its place in our hearts and homes.

Why You’ll Love This Recipe

  • Family favorite: This casserole has been a staple at family gatherings for years, ensuring everyone leaves the table with a full belly and a happy heart.
  • Comfort in every bite: The creamy sauce and tender chicken combine to create a symphony of flavors that reminds you of home.
  • Easy to prepare: With just a handful of ingredients and a few simple steps, you can whip this up in no time.
  • Perfect for leftovers: This dish tastes even better the next day, making it ideal for meal prep or potlucks.
  • Customizable: Tailor the ingredients to your liking, whether you prefer adding veggies, different cheeses, or spices.

Ingredients Breakdown

Let’s gather our ingredients for the ultimate chicken casserole. Remember, you can always make substitutions based on what you have on hand.

  • Chicken: Use cooked rotisserie chicken for convenience, or poach your own for a fresh flavor.
  • Cream of Chicken Soup: If you’re avoiding processed foods, consider making your own creamy sauce from scratch.
  • Cheese: Cheddar is a classic choice, but feel free to mix it up with Monterey Jack or even a sprinkle of Parmesan.
  • Vegetables: Frozen mixed veggies work well, or you can use fresh broccoli, peas, or carrots depending on your taste.
  • Topping: A crunchy topping like crushed crackers or bread crumbs adds delightful texture—don’t skip this step!

Step-by-Step Guide to Make Your Chicken Casserole

Side view of a hearty chicken casserole showcasing layers of ingredients in a baking dish.

Now that we have our ingredients, let’s get cooking! Follow these easy steps:

  1. Preheat your oven to 350°F (175°C).
  2. In a large bowl, combine the cooked chicken, cream of chicken soup, and half of the cheese. Stir in your chosen vegetables until everything is well mixed.
  3. Transfer the mixture to a greased casserole dish, smoothing it into an even layer.
  4. Top with the remaining cheese and your choice of crunchy topping.
  5. Bake in the preheated oven for 25-30 minutes, or until bubbly and golden brown.
  6. Let it cool for a few minutes before serving to allow the flavors to settle.

Pro Tips for the Best Chicken Casserole

  • Use leftover chicken: This recipe is perfect for utilizing leftover roast chicken, saving you time and reducing waste.
  • Don’t overmix: When combining ingredients, mix just until combined to keep the chicken tender.
  • Cover with foil: If the top is browning too quickly, cover with aluminum foil halfway through baking.
  • Add herbs: Fresh or dried herbs like thyme or rosemary can elevate the flavor profile.
  • Try different cheeses: Experiment with flavors by mixing in some pepper jack or gouda for a smoky kick.
  • Allow to rest: Giving your casserole a few moments to rest after baking helps it hold its shape when serving.
  • Make it a meal: Serve with a side salad or warm bread to round out the meal.
  • Freeze for later: This dish freezes beautifully! Make a double batch and save one for a busy weeknight.

Avoiding Common Mistakes

Even the best of us can stumble while cooking. Here are some common pitfalls and how to avoid them:

  • Using raw chicken: Ensure your chicken is fully cooked before mixing it into the casserole to prevent foodborne illnesses.
  • Overbaking: Keep an eye on the casserole as it bakes; overbaking can result in dry chicken and a tough texture.
  • Skipping the topping: A crunchy topping adds an essential layer of flavor and texture—don’t skip it!
  • Not seasoning: Don’t forget to season your mixture; a pinch of salt and pepper can make a world of difference.

Variations to Spice Things Up

If you want to switch things up, try these variations:

  • Chicken and Broccoli Casserole: Add fresh broccoli florets for a healthier twist.
  • Buffalo Chicken Casserole: Mix in buffalo sauce for a spicy kick that will tantalize your taste buds.
  • Cheesy Chicken and Rice: Incorporate cooked rice into the mixture for a heartier dish.
  • Mushroom Chicken Casserole: Sauté mushrooms and mix them in for an earthy flavor.

Storage and Make-Ahead Instructions

Planning ahead can make your life easier. Here’s how to store and prep your casserole:

  • Refrigeration: Store leftovers in an airtight container in the fridge for up to 3-4 days.
  • Freezing: Wrap tightly in plastic wrap and foil; it can last in the freezer for up to 3 months.
  • Make-ahead: Assemble the casserole a day in advance and refrigerate, baking it just before serving.

Frequently Asked Questions

Got questions? Here are some answers to help you navigate your chicken casserole journey:

  • Can I use frozen chicken? Yes, just make sure it’s completely thawed and cooked before adding it to the casserole.
  • What can I substitute for cream of chicken soup? Homemade white sauce or a mixture of sour cream and chicken broth works well.
  • How do I make it dairy-free? Use coconut milk or a dairy-free cheese alternative.
  • Can I make this casserole gluten-free? Substitute regular bread crumbs with gluten-free options.
  • How long does it take to bake? Typically, 25-30 minutes at 350°F (175°C) should do the trick.
  • Can I add pasta to the casserole? Absolutely! Cooked pasta can be a wonderful addition for a heartier meal.
  • What’s the best way to reheat? Reheat in the oven at 350°F (175°C) for best results, ensuring it’s heated through.
  • Can I use turkey instead of chicken? Of course! Leftover turkey works perfectly in this recipe.

Nutrition Tips and Dietary Adaptations

Keeping health in mind? Here are some modifications you can consider:

  • Lean protein: Use skinless chicken breast for a lower-fat option.
  • Veggie-packed: Load up on vegetables to increase fiber and nutrients.
  • Low-carb: Swap out pasta or rice for cauliflower rice for a low-carb version.

Essential Equipment Recommendations

You don’t need fancy gadgets to make a great casserole. Here’s what you’ll need:

  • Casserole dish: A sturdy glass or ceramic dish will work best for even cooking.
  • Mixing bowl: A large bowl is essential for combining your ingredients without spills.
  • Measuring cups and spoons: Accuracy is key in cooking, so have these handy.

Serving Suggestions

To make your meal even more delightful, consider these serving ideas:

  • Fresh salad: A crisp green salad pairs well with the richness of the casserole.
  • Crusty bread: Serve with a side of warm, crusty bread to soak up the creamy sauce.
  • Pickles or relish: A sharp, tangy side can balance the richness beautifully.

In conclusion, this chicken casserole recipe is more than just a dish; it’s a way to gather loved ones around the table and create lasting memories. With its comforting flavors and simple preparation, you’ll find yourself turning to this recipe time and time again, just like the generations before you. So roll up your sleeves, gather your ingredients, and let’s celebrate the joy of home-cooked meals together!

Classic Spaghetti Carbonara

Prep Time 10 minutes
Cook Time 15 minutes
Total Time 25 minutes
Servings 4 servings
Calories 550
A quick and creamy Italian pasta dish made with eggs, cheese, pancetta, and pepper.

Ingredients

Pasta

  • 400 grams spaghetti
  • 150 grams pancetta (diced)
  • 3 large eggs (beaten)
  • 1 cup Parmesan cheese (grated)
  • 1 teaspoon black pepper (freshly ground)

Salt

  • to taste salt

Instructions 

  • Cook spaghetti in boiling salted water until al dente, then drain.
  • Cook pancetta in a skillet until crispy.
  • Mix eggs and Parmesan in a bowl.
  • Combine hot pasta with pancetta, then quickly mix in egg mixture to create a creamy sauce.
  • Season with black pepper and salt to taste, then serve immediately.

Notes

Use freshly grated Parmesan for best flavor.
Calories: 550kcal
Cost: $12
Course: Main Course
Cuisine: Italian
Keyword: Pasta

A Comforting Classic: Creamy Rotisserie Chicken Pasta

Welcome to a dish that wraps you in warmth and nostalgia: Creamy Rotisserie Chicken Pasta. With every spoonful, you’re not just eating; you’re savoring a home-cooked meal that speaks of family gatherings and cherished memories. This recipe is perfect for busy weeknights when you need something hearty that doesn’t skimp on flavor. Let’s dive into why this creamy delight should be on your dinner table.

Why You’ll Love This Recipe

  • Quick to Prepare: With rotisserie chicken on hand, this dish comes together in just 30 minutes, perfect for those hectic evenings.
  • Rich and Creamy: The combination of heavy cream and Parmesan cheese creates a silky sauce that clings to every piece of pasta, ensuring every bite is bursting with flavor.
  • Versatile Ingredients: This recipe is a blank canvas. You can easily swap in your favorite vegetables or pasta types, making it customizable for every palate.
  • Hearty and Satisfying: Filled with shredded chicken and fresh spinach, this dish is not only delicious but also filling enough to satisfy the whole family.
  • Leftover Friendly: This creamy rotisserie chicken pasta stores well, allowing you to enjoy it as a quick lunch or dinner later in the week.

Ingredients You’ll Need

Gathering your ingredients is half the fun! Here’s what you’ll need to whip up this comforting dish:

  • 2 cups shredded rotisserie chicken
  • 8 oz pasta (penne or fettuccine works best)
  • 1 cup heavy cream
  • 1/2 cup freshly grated Parmesan cheese
  • 3 cloves garlic, minced
  • 1 cup low-sodium chicken broth
  • 2 cups fresh spinach
  • Salt and pepper to taste
  • 1 tbsp olive oil

How to Make Creamy Rotisserie Chicken Pasta

Side view of a hearty bowl of creamy chicken pasta, showcasing fresh ingredients and sauce.

Let’s get cooking! Follow these simple steps to create your hearty bowl of comfort:

  1. Cook pasta according to package instructions until al dente. Drain and set aside.
  2. In a large skillet, heat olive oil over medium heat. Sauté minced garlic for about one minute until fragrant.
  3. Add heavy cream and chicken broth to the skillet; stir well and let simmer for about five minutes until slightly thickened.
  4. Stir in shredded chicken and fresh spinach; cook until spinach wilts, about two minutes.
  5. Combine cooked pasta with the sauce, tossing until evenly coated. Season with salt and pepper as needed.
  6. Serve warm, garnished with freshly grated Parmesan cheese.

Pro Tips for the Best Results

  • Use Fresh Ingredients: Fresh spinach and high-quality Parmesan can elevate the dish’s flavor and texture.
  • Control the Creaminess: If you like a thicker sauce, let it simmer longer before adding the chicken and spinach.
  • Don’t Overcook the Pasta: Aim for al dente; it will continue to cook when mixed with the sauce.
  • Customize Your Veggies: Feel free to add in some chopped bell peppers or mushrooms for extra nutrition.
  • Make it Spicy: A pinch of red pepper flakes can add a delightful kick!
  • Save a Little Pasta Water: If your sauce is too thick, add a splash of the reserved pasta water to loosen it up.
  • Leftover Chicken? No Problem!: This recipe is a great way to use up any leftover rotisserie chicken from earlier in the week.
  • Pair with Garlic Bread: Serve with garlic bread or a simple salad for a complete meal.

Common Mistakes to Avoid

Like any good dish, there are a few pitfalls to watch out for:

  • Skipping the Seasoning: Always taste and adjust the seasoning. Salt and pepper can make a world of difference.
  • Overcooking the Chicken: Since the chicken is pre-cooked, just warm it through instead of cooking it again.
  • Using Cold Ingredients: Bring your ingredients to room temperature before cooking for a more even heat distribution.
  • Not Draining the Pasta: Make sure to drain your pasta well to avoid a watery sauce.

Delicious Variations

Feel free to get creative! Here are some variations to try:

  • Cheesy Broccoli Rotisserie Chicken Pasta: Add steamed broccoli to the mix for a pop of color and nutrition.
  • Buffalo Chicken Pasta: Stir in some buffalo sauce for a spicy twist that’s perfect for game day.
  • Mediterranean Style: Toss in olives, sun-dried tomatoes, and feta cheese for a Mediterranean flair.
  • One-Pot Wonder: Cook the pasta directly in the sauce for a simplified one-pot version.

Storage and Make-Ahead Instructions

This dish is a great candidate for meal prep. Here’s how to store it:

  • Refrigerate: Store in an airtight container in the fridge for up to 3-4 days.
  • Freeze: For longer storage, freeze in individual portions for up to 3 months. Let thaw in the fridge overnight before reheating.
  • Reheat: Warm in the microwave or on the stovetop, adding a splash of chicken broth or cream to restore creaminess.

FAQs About Creamy Rotisserie Chicken Pasta

  • Can I use rotisserie chicken leftovers? Absolutely! This dish is perfect for using up leftover chicken.
  • What type of pasta is best? Penne or fettuccine works well, but you can use any pasta you have on hand.
  • Can I make this dish dairy-free? Yes! Substitute heavy cream with coconut milk and skip the cheese.
  • How can I add more flavor? Add herbs like thyme or basil to enhance the flavor profile.
  • Is this recipe kid-friendly? Definitely! The creamy sauce and tender chicken are usually a hit with kids.
  • Can I make this gluten-free? Yes! Use gluten-free pasta instead of regular pasta.
  • How do I make the sauce thicker? Let it simmer longer or add a cornstarch slurry to thicken.
  • What can I serve with this pasta? Garlic bread or a fresh garden salad makes for a lovely side.

Nutritional Tips and Dietary Adaptations

If you’re looking to make this dish healthier, consider these tips:

  • Whole Grain Pasta: Opt for whole grain or legume-based pasta for added fiber and protein.
  • Low-Fat Cream: Use low-fat cream or a dairy alternative to reduce calories.
  • Add More Vegetables: Sneak in extra veggies like zucchini or bell peppers for added nutrition.
  • Cut Down on Sodium: Choose low-sodium chicken broth to keep the dish heart-healthy.

Essential Kitchen Equipment

Before you start cooking, make sure you have:

  • Large Skillet: For sautéing and sauce preparation.
  • Pot for Pasta: A large pot to cook your pasta al dente.
  • Wooden Spoon: For mixing and serving.
  • Measuring Cups and Spoons: To ensure accuracy in your ingredients.

Serving Suggestions

To complete your meal, consider these serving ideas:

  • Garnish with Fresh Herbs: A sprinkle of parsley or basil adds a fresh touch.
  • Pair with a Salad: A simple mixed greens salad can balance the richness of the dish.
  • Offer a Side of Bread: Garlic bread or a crusty baguette is perfect for soaking up the creamy sauce.
  • Serve with a Glass of Wine: A crisp white wine complements the flavors beautifully.

Conclusion

In just under an hour, you can create a dish that’s more than just dinner—it’s a comforting experience that brings everyone together. With its simple ingredients and straightforward preparation, this Creamy Rotisserie Chicken Pasta is sure to become a family favorite. So gather your loved ones around the table, and enjoy the hearty flavors of home-cooked goodness. Happy cooking!

Creamy Rotisserie Chicken Pasta

Prep Time 10 minutes
Cook Time 15 minutes
Total Time 25 minutes
Servings 4 servings
Calories 650
A quick and creamy pasta dish featuring shredded rotisserie chicken and fresh spinach, perfect for a satisfying weeknight dinner.

Ingredients

Main Ingredients

  • 2 cups shredded rotisserie chicken
  • 8 oz pasta (penne or fettuccine)
  • 1 cup heavy cream
  • 1/2 cup freshly grated Parmesan cheese
  • 3 cloves garlic, minced
  • 1 cup low-sodium chicken broth
  • 2 cups fresh spinach
  • to taste Salt and pepper
  • 1 tbsp olive oil

Instructions 

  • Cook pasta until al dente, then drain.
  • Heat olive oil and sauté garlic for one minute.
  • Add heavy cream and chicken broth; simmer for five minutes.
  • Stir in chicken and spinach; cook until spinach wilts.
  • Combine pasta with sauce, season, and serve with Parmesan.

Notes

For extra flavor, sprinkle with additional Parmesan or herbs.
Calories: 650kcal
Cost: $15
Course: Main Course
Cuisine: American
Keyword: chicken

Welcome to the Heart of Honey Mustard Chicken Pasta

Cooking is like a warm hug; it brings people together, especially when it’s about a dish that feels like home. Today, we’re diving deep into a recipe that’s both comforting and delicious: Honey Mustard Chicken Pasta. This hearty dish combines tender chicken, a rich creamy sauce, and the delightful tang of honey mustard, creating a meal that’s perfect for family dinners or cozy nights in. Whether you’re a seasoned chef or a beginner in the kitchen, this recipe is easy to follow and guaranteed to impress.

Why You’ll Love This Recipe

Before we jump into the details, let me share why this recipe should be on your dinner table:

  • Quick and Easy: You can whip this up in about 30 minutes, making it perfect for busy weeknights.
  • Comfort Food Classic: The creamy sauce and tender chicken create a dish that feels like a warm embrace.
  • Family-Friendly: Kids and adults alike will love the sweet and tangy flavors, making it a crowd-pleaser.
  • Versatile Ingredients: It uses simple ingredients you likely have on hand, making it easy to prepare anytime.
  • Meal Prep Friendly: Leftovers taste even better the next day and can be easily stored for a quick meal.

Ingredients Breakdown

Here’s what you’ll need to create this delightful dish:

  • 10.5 ounces penne pasta: This pasta holds the sauce beautifully, but feel free to swap for your favorite.
  • 2 cups diced chicken breast: Tender chicken adds protein and heartiness.
  • 2 tablespoons honey mustard: The star of the show, providing that signature sweet and tangy flavor.
  • 1/2 cup heavy cream: For a creamy texture that envelops the pasta.
  • 1/2 cup chicken broth: Adds depth and enhances the overall flavor.

Ingredient Substitutions

If you’re missing something or want to switch it up, consider these substitutions:

  • Pasta: Any pasta shape works well, including rotini or spaghetti.
  • Chicken: Feel free to use rotisserie chicken for an even quicker option.
  • Heavy cream: For a lighter version, swap with half-and-half or milk, but keep in mind the sauce will be thinner.
  • Honey mustard: You can make your own using equal parts honey and yellow mustard if you’re in a pinch.

Step-by-Step Instructions

Side angle photo of creamy Honey Mustard Chicken Pasta showcasing chicken and sauce.

Let’s get cooking! Follow these steps for a delightful dinner:

  • Step 1: Boil the penne pasta in a large pot filled with salted water until al dente. Drain well and set aside.
  • Step 2: Heat a large skillet over medium-high heat. Add diced chicken breast and sauté until golden and cooked through, about 5-7 minutes.
  • Step 3: Reduce the heat to medium. Add honey mustard, heavy cream, and chicken broth to the skillet. Stir and allow the sauce to simmer until slightly thickened, which should take about 3-5 minutes.
  • Step 4: Add the drained penne pasta to the skillet and gently combine with the sauce and chicken. Toss to coat thoroughly and serve hot.

Pro Tips for Perfect Honey Mustard Chicken Pasta

Here are some insider tips to elevate your dish:

  • Don’t Overcook the Pasta: Aim for al dente to prevent mushiness.
  • Use Fresh Ingredients: Fresh herbs like parsley can brighten the dish.
  • Adjust the Sauce: If you prefer it creamier, feel free to add more heavy cream.
  • Chicken Tips: For extra flavor, marinate the chicken in honey mustard before cooking.
  • Serving Temperature: This dish is best served hot, right after cooking.
  • Pair with Greens: Serve with a side of steamed green beans for added nutrition and color.
  • Storage: Ensure it cools completely before storing in an airtight container.
  • Reheating: Add a splash of chicken broth when reheating to maintain moisture.

Common Mistakes and Troubleshooting

Let’s prevent any kitchen mishaps!

  • Too Thick Sauce: If your sauce is thicker than desired, add a little more broth.
  • Overcooked Chicken: Avoid overcooking your chicken to keep it tender; use a meat thermometer for accuracy.
  • Flavorless Dish: Season each component; a pinch of salt in the pasta water and seasoning the chicken can make a difference.

Variations to Try

Want to switch things up? Here are some tasty variations:

  • Spicy Kick: Add a pinch of cayenne pepper or red pepper flakes to the sauce for a little heat.
  • Veggie Delight: Toss in some sautéed bell peppers or spinach for added nutrition and color.
  • Cheesy Goodness: Stir in some grated Parmesan cheese for a richer flavor.
  • Herb Infusion: Add fresh thyme or basil for an aromatic touch.

Storage and Make-Ahead Instructions

This dish is great for meal prep! Here’s how to store it:

  • In the Fridge: Store in an airtight container for up to 3 days. Reheat gently on the stove.
  • In the Freezer: Freeze for up to 2 months. Thaw in the fridge overnight before reheating.

Frequently Asked Questions

Here are some common questions you might have:

  • Can I use whole grain pasta? Yes, whole grain pasta works well and adds extra fiber.
  • Is this recipe gluten-free? You can use gluten-free pasta for a gluten-free version.
  • Can I make it vegetarian? Substitute chicken with chickpeas or tofu and use vegetable broth.
  • How do I make the sauce thicker? Add a bit of cornstarch mixed with cold water and stir it in while simmering.
  • What should I serve with this dish? A green salad or steamed vegetables pairs nicely.
  • Is it okay to use frozen chicken? Yes, just make sure it’s fully cooked through before serving.
  • Can I add more mustard? Absolutely! Adjust to your taste preference.
  • What’s the best way to reheat leftovers? Add a splash of broth when reheating to keep it creamy.

Nutrition Tips and Dietary Adaptations

For those conscious of their diet, here are some tips:

  • Low-Calorie Option: Use low-fat cream or Greek yogurt instead of heavy cream.
  • Protein Boost: Add more chicken or legumes for a protein-packed meal.
  • Fiber Rich: Incorporate whole wheat pasta and add vegetables for more fiber.

Equipment Recommendations

Here’s what you’ll need:

  • Large Pot: For boiling pasta.
  • Skillet: A large skillet is ideal for sautéing chicken and simmering the sauce.
  • Measuring Cups and Spoons: To ensure accurate ingredient measurements.
  • Wooden Spoon: For stirring the sauce and pasta together.

Serving Suggestions

To make your meal even more inviting:

  • Garnish with Fresh Herbs: A sprinkle of parsley or chives adds a burst of freshness.
  • Serve with Bread: A side of crusty bread is perfect for soaking up the creamy sauce.
  • Pair with Wine: A glass of white wine complements the dish wonderfully.

Conclusion: A Taste of Home Awaits

Honey Mustard Chicken Pasta is more than just a meal; it’s a reminder of home, comfort, and the joy of sharing good food with loved ones. Whether you’re enjoying it on a quiet weeknight or at a festive gathering, this dish is sure to bring smiles to the table. So roll up your sleeves, gather your ingredients, and let’s create a dish that warms the heart and fills the belly. Happy cooking!

Honey Mustard Chicken Pasta

Prep Time 10 minutes
Cook Time 15 minutes
Total Time 25 minutes
Servings 4 servings
Calories 650
A quick and flavorful pasta dish combining tender chicken, sweet honey mustard, and creamy sauce for a satisfying meal.

Ingredients

Pasta

  • 10.5 ounces penne pasta
  • 2 cups diced chicken breast
  • 2 tablespoons honey mustard
  • 1/2 cup heavy cream
  • 1/2 cup chicken broth

Instructions 

  • Cook penne pasta in salted boiling water until al dente, then drain.
  • Sauté diced chicken in a skillet until golden and cooked through.
  • Add honey mustard, heavy cream, and chicken broth; simmer until slightly thickened.
  • Combine pasta with sauce and chicken; toss to coat and serve hot.

Notes

For extra flavor, garnish with fresh herbs or grated cheese.
Calories: 650kcal
Cost: $15
Course: Main Course
Cuisine: American
Keyword: Pasta

The Heart and Soul of Chicken Cooking: A Comprehensive Guide

Welcome, friends! Today, we’re diving into the world of chicken, a staple that brings warmth and comfort to our tables. From fried to roasted, chicken is not just a meal; it’s a memory, a family tradition, and a symbol of home. With this guide, you’re not only going to learn about various chicken recipes but also discover the essence of why chicken deserves a special place in our hearts and kitchens.

Why You’ll Love This Guide

Cooking chicken can be an art. Here are five reasons why you’ll cherish the recipes and tips shared in this guide:

  • Versatility: Chicken can be prepared in countless ways—grilled, fried, roasted, or simmered. You can tailor it to any occasion, whether it’s a family dinner or a festive gathering.
  • Health Benefits: Lean protein source that supports muscle growth and overall health. Chicken is a great choice for nutritious meals that don’t compromise on flavor.
  • Quick and Easy: Many chicken recipes can be prepared in under an hour, making it perfect for busy weeknight dinners.
  • Crowd-Pleaser: With its mild flavor, chicken is a favorite for all ages, ensuring everyone at the table will be satisfied.
  • Budget-Friendly: Chicken is often more affordable than other meats, making it a practical choice for families looking to save without sacrificing taste.

Ingredient Breakdown: What You’ll Need

Let’s talk about the essential ingredients you’ll need to create wonderful chicken dishes, along with some handy substitutions:

  • Chicken Parts: Use whole chickens for roasting, or opt for breasts, thighs, or wings depending on your recipe. If you can’t find fresh, frozen chicken works just fine.
  • Herbs and Spices: Fresh herbs like rosemary, thyme, and parsley elevate the flavor. If fresh isn’t available, dried herbs can do the trick.
  • Liquids: Chicken broth or stock is essential for soups and stews. You can substitute with vegetable broth for a lighter option.
  • Fat: Olive oil or butter is often used for sautéing. To make it healthier, you can use cooking spray or chicken broth.
  • Vegetables: Carrots, onions, and celery are classic aromatics. Feel free to add your favorites, like bell peppers or zucchini.

Pro Tips for Perfect Chicken Every Time

Delicious chicken recipe presented in a close-up view.

To make your chicken dishes shine, consider these expert insights:

  • Brining: Soak your chicken in a saltwater solution for at least an hour before cooking to enhance moisture and flavor.
  • Room Temperature: Let your chicken sit at room temperature for about 30 minutes before cooking. This ensures even cooking.
  • Don’t Overcrowd the Pan: When cooking, give chicken space to breathe in the pan to achieve that beautiful golden crust.
  • Use a Meat Thermometer: To ensure safety, cook chicken to an internal temperature of 165°F (75°C).
  • Resting Period: Allow your chicken to rest for 10-15 minutes after cooking. This helps retain juices.
  • Flavor Boost: Marinate your chicken overnight in the refrigerator to infuse it with deep flavors.
  • Skillet to Oven Method: Start cooking chicken on the stovetop to get a good sear, then finish in the oven for juicy results.
  • Experiment with Sauces: From barbecue to sweet and sour, sauces can elevate chicken to new heights.

Avoiding Common Mistakes

Here are a few pitfalls to steer clear of while cooking chicken:

  • Cooking from Frozen: Always thaw your chicken completely before cooking to ensure even cooking.
  • Not Seasoning Enough: Don’t skimp on seasoning. A well-seasoned chicken is a happy chicken.
  • Skipping the Resting Step: Cutting into chicken too soon will let the juices escape.
  • Using the Wrong Cooking Method: Match the cooking method to the cut of chicken. For instance, thighs are great for braising, while breasts are perfect for grilling.

Delicious Chicken Variations

Let’s explore a few variations of chicken dishes to keep things exciting:

  • Spicy Honey Garlic Chicken: Toss chicken pieces in a sweet and spicy marinade before grilling or baking for a sticky finish.
  • Herb-Roasted Chicken: Rub your whole chicken with a mix of fresh herbs, garlic, and lemon before roasting.
  • Chicken Tacos: Use shredded chicken, seasoned with taco spices, served in corn tortillas with your favorite toppings.
  • Buffalo Chicken Salad: Toss grilled chicken with buffalo sauce and serve over a bed of greens with blue cheese dressing.

Storage and Make-Ahead Instructions

Want to prepare in advance? Here’s how to store your chicken dishes:

  • Refrigeration: Store cooked chicken in an airtight container in the fridge for up to 4 days.
  • Freezing: Freeze chicken dishes in freezer-safe containers for up to 3 months. Thaw in the fridge overnight before reheating.
  • Make-Ahead Meals: Cook chicken dishes like casseroles or soups a day ahead and let the flavors meld overnight.

Frequently Asked Questions

Here’s a collection of common questions about cooking chicken:

  • Can I use frozen chicken in recipes? It’s best to thaw chicken before cooking to ensure even results.
  • What’s the best way to season chicken? Use a mix of salt, pepper, and your choice of herbs or spices to enhance flavor.
  • How long do I cook chicken in the oven? Cooking time depends on the cut—breasts take about 20-30 minutes at 375°F, while a whole chicken may take closer to 1-1.5 hours.
  • What temperature should chicken be cooked to? Always cook chicken to an internal temperature of 165°F (75°C) for safety.
  • Can I marinate chicken overnight? Yes, marinating chicken overnight can deeply enhance flavor.
  • What’s the best way to reheat chicken? Reheat in the oven at a low temperature to avoid drying it out.
  • Can I substitute chicken with another protein? Yes, many recipes work well with pork, turkey, or tofu.
  • How can I make chicken dishes more flavorful? Experiment with different spices, marinades, and cooking methods to find what you love.

Nutritional Tips and Dietary Adaptations

For those watching their health, here are some tips:

  • Choose Lean Cuts: Opt for chicken breasts over thighs for lower fat content.
  • Skin-On vs. Skinless: Removing the skin can help reduce calories and fat.
  • Use Whole Grains: Serve chicken with quinoa or brown rice for a fiber boost.
  • Load Up on Veggies: Pair chicken with a variety of colorful vegetables for added nutrients.

Essential Equipment for Chicken Cooking

To make your chicken cooking experience smooth and enjoyable, consider these essential tools:

  • Sharp Knife: A good chef’s knife is crucial for cutting and prepping chicken.
  • Cutting Board: Use a separate board for chicken to avoid cross-contamination.
  • Oven Thermometer: Ensure your oven is at the right temperature for consistent results.
  • Meat Thermometer: Invest in a reliable thermometer to check doneness.
  • Cast Iron Skillet: Great for searing and transferring from stovetop to oven.

Serving Suggestions

To elevate your chicken dishes, consider these serving ideas:

  • Fresh Herbs: Garnish with chopped parsley or cilantro for a burst of color and flavor.
  • Side Dishes: Serve with roasted vegetables, a fresh salad, or fluffy mashed potatoes.
  • Delicious Sauces: Pair with homemade gravy, barbecue sauce, or a squeeze of lemon for extra zest.

As we wrap up this hearty guide, remember that cooking chicken is more than just a task—it’s a way to bring loved ones together, share stories, and create lasting memories. So fire up your stove, gather your ingredients, and let’s cook something wonderful that warms both the heart and the belly. Happy cooking, friends!

Browse By

Prep Time 10 minutes
Cook Time 20 minutes
Total Time 30 minutes
Servings 4 servings
Calories 250
Explore a variety of recipes categorized by meal type and ingredients to suit any occasion.

Ingredients

Categories

  • 1 unit Home
  • 1 unit RECIPESBreakfastLunchDinnerDessertsSeafood
  • 1 unit Breakfast
  • 1 unit Lunch
  • 1 unit Dinner
  • 1 unit Desserts
  • 1 unit Seafood
  • 1 unit IngredientsChickenBeefSaladsSoup
  • 1 unit Chicken
  • 1 unit Beef
  • 1 unit Salads
  • 1 unit Soup
  • 1 unit In the KitchenAirfryer Recipes
  • 1 unit Airfryer Recipes
  • 1 unit New Year’s Day Recipes
  • 1 unit Valentine’s Day Recipes
  • 1 unit St. Patrick’s Day Recipes
  • 1 unit Easter Recipes
  • 1 unit Mother’s Day Recipes
  • 1 unit Juneteenth Recipes
  • 1 unit Independence Day Recipes
  • 1 unit Halloween Recipes
  • 1 unit Thanksgiving Recipes
  • 1 unit Christmas Recipes
  • 1 unit About Us
  • 1 unit Contact Us

Instructions 

  • Explore the categories to find recipes suited for any occasion.
  • Select a category to view relevant recipes.
  • Follow the provided instructions to prepare your dish.
  • Enjoy your meal!

Notes

Feel free to customize categories to suit your preferences.
Calories: 250kcal
Cost: $15
Course: Breakfast, Desserts, dinner, Lunch
Cuisine: Various
Keyword: Home

Transform Your Weeknight Dinners with This Skillet Wonder

When it comes to preparing comforting meals that warm the heart and satisfy the soul, few dishes can rival the allure of a quick garlic butter chicken and potatoes skillet. This hearty recipe combines tender chicken thighs with golden, crispy potatoes, all drenched in a rich garlic butter sauce. It’s more than just dinner; it’s a nostalgic journey back to family gatherings where love and laughter filled the air. In this article, we’ll explore the ins and outs of creating this delightful dish, ensuring every bite is packed with flavor and warmth.

Why You’ll Love This Recipe

  • Quick and Easy: This dish is perfect for busy weeknights, taking just 30 minutes from start to finish without sacrificing flavor.
  • Flavor-Packed: The combination of garlic and butter creates an irresistible aroma, enhancing the taste of both the chicken and potatoes.
  • One-Pan Wonder: Minimal cleanup is required since everything cooks in a single skillet, making it easier to enjoy your meal.
  • Customizable: You can easily adapt the recipe to suit your family’s preferences by swapping in different veggies or seasonings.
  • Comfort Food Vibes: The rich, buttery sauce enveloping tender chicken and crispy potatoes is pure comfort food, perfect for chilly evenings.

Ingredients for Garlic Butter Chicken & Potatoes Skillet

Let’s gather the ingredients that will make this dish shine. Each component plays a vital role in creating a well-balanced and delicious meal. Here’s what you’ll need:

  • 2 lbs (900g) Boneless, Skinless Chicken Thighs: Cut into 1.5-inch pieces for uniform cooking.
  • 2 tbsp Olive Oil: For sautéing; you can substitute with vegetable oil if necessary.
  • 1 tsp Smoked Paprika: Adds a touch of smokiness; regular paprika works too.
  • 1/2 tsp Dried Thyme: A perfect herb to complement chicken; feel free to use fresh thyme if you have it.
  • 1/2 tsp Garlic Powder: Enhances the garlic flavor; fresh garlic is also a great option.
  • Salt and Freshly Ground Black Pepper: To taste; don’t be shy with these, as they bring out the flavors.
  • 1.5 lbs (680g) Small Red or Yukon Gold Potatoes: Cut into 1-inch pieces; baby potatoes can also be used for convenience.
  • 1/2 tsp Onion Powder: Adds depth to the seasoning mix; you can skip it if you don’t have it.
  • 6 tbsp Unsalted Butter: Essential for that rich garlic butter sauce.
  • 8-10 Cloves Garlic: Minced; the more garlic, the better!
  • 1/4 cup Chicken Broth: Helps deglaze the pan; vegetable broth is a good alternative for a lighter flavor.
  • 2 tbsp Fresh Lemon Juice: Brightens the dish; lime juice can also work in a pinch.
  • 1/4 cup Fresh Parsley: Chopped, for garnish; you can use other herbs like chives or basil if preferred.
  • 1 tsp Red Pepper Flakes (Optional): For those who like a little kick, add more for extra heat.

Step-by-Step Instructions

Juicy pieces of chicken and golden potatoes cooking in a buttery garlic sauce, presented in a skillet.

Now that we have our ingredients ready, let’s dive into the cooking process. Follow these simple steps to create your garlic butter chicken and potatoes skillet:

  1. Prepare Chicken: Pat the chicken dry and cut it into 1.5-inch pieces. In a bowl, toss the chicken with 1 tablespoon of olive oil, smoked paprika, thyme, garlic powder, salt, and pepper until fully coated.
  2. Prepare Potatoes: Wash and cut the potatoes into 1-inch pieces. In another bowl, toss the potatoes with 1 tablespoon of olive oil, onion powder, salt, and pepper until evenly coated.
  3. Cook Potatoes: Heat 2 tablespoons of unsalted butter in a large oven-safe skillet over medium-high heat. Add the seasoned potatoes in a single layer. Cook undisturbed for 5-7 minutes until golden, then stir and cook for an additional 10-13 minutes until they are tender and crispy. Transfer the potatoes to a plate and set aside.
  4. Cook Chicken: In the same skillet, add 2 tablespoons of unsalted butter. When it’s melted, add the seasoned chicken pieces in a single layer. Cook for about 4-6 minutes on each side until golden brown and cooked through (internal temperature should reach 165°F/74°C). Transfer the chicken to the plate with the potatoes.
  5. Make Garlic Butter Sauce: Reduce the heat to medium-low. Add the remaining 2 tablespoons of unsalted butter, minced garlic, and red pepper flakes (if using) to the skillet. Sauté the garlic for 1-2 minutes until fragrant and slightly golden; be careful not to burn it.
  6. Deglaze and Finish Sauce: Pour in the chicken broth, scraping up all the delicious browned bits from the skillet. Let it simmer for 1-2 minutes to reduce slightly. Remove from heat and stir in the fresh lemon juice. Taste and adjust seasonings as needed.
  7. Combine and Serve: Return the cooked chicken and potatoes to the skillet. Toss gently to coat everything thoroughly in the garlic butter sauce. Garnish generously with chopped parsley and serve immediately.

Pro Tips for Perfecting Your Skillet Dinner

To elevate your garlic butter chicken and potatoes skillet, consider these expert tips:

  • Uniform Sizing: Cut the chicken and potatoes into similar sizes for even cooking and browning.
  • Marinate Overnight: For deeper flavor, marinate the chicken in the spices for a few hours or overnight.
  • Use a Cast Iron Skillet: This enhances heat retention and gives a wonderful sear to your chicken.
  • Don’t Rush the Potatoes: Allow them to cook undisturbed for the first few minutes to get that perfect crispiness.
  • Upgrade Your Sauce: Experiment with adding a splash of white wine or a spoonful of dijon mustard to the garlic butter sauce for extra depth.
  • Garnish Creatively: Besides parsley, try fresh thyme, chives, or a sprinkle of grated cheese for a flavor boost.
  • Leftover Love: This dish reheats beautifully, making it great for meal prep or leftovers.
  • Serve With Sides: Pair with steamed vegetables or a fresh salad for a balanced meal.

Common Mistakes and Troubleshooting

Even the best chefs can encounter a few bumps along the way. Here are some common mistakes to avoid:

  • Overcrowding the Pan: Cooking too much chicken or potatoes at once can lead to steaming instead of browning. Work in batches if necessary.
  • Burnt Garlic: Garlic can burn quickly; keep a close eye on it while sautéing.
  • Undercooked Chicken: Always check the internal temperature of the chicken to ensure it’s safe to eat.
  • Soggy Potatoes: Make sure the potatoes are well-drained before adding to the skillet to avoid excess moisture.

Variations on This Hearty Dish

If you’re looking to mix things up, here are a few variations of this skillet dinner:

  • Vegetable Medley: Add in seasonal vegetables like bell peppers, zucchini, or green beans for extra nutrition.
  • Herb-Infused: Swap out the thyme for rosemary or oregano to change the flavor profile.
  • Cheesy Garlic Butter Chicken: Sprinkle shredded cheese on top during the last few minutes of cooking for a gooey finish.
  • Lemon Garlic Butter: Increase the lemon juice and zest for a brighter, fresher taste.

Make-Ahead and Storage Tips

This garlic butter chicken and potatoes skillet is perfect for meal prep. Here’s how to make it ahead:

  • Make Ahead: You can prepare the chicken and potatoes a day in advance. Store them in an airtight container in the fridge before cooking.
  • Storage: Leftovers can be kept in the fridge for up to 3 days. Reheat gently in the microwave or on the stovetop.
  • Freezing: While best fresh, you can freeze the cooked dish for up to 3 months. Thaw overnight in the fridge before reheating.

FAQ: Your Garlic Butter Chicken & Potatoes Questions Answered

  • Can I use frozen chicken? Yes, but ensure it’s fully thawed and pat dry before seasoning.
  • What type of pan is best? An oven-safe skillet, preferably cast iron, is ideal for this dish.
  • How long does it take to prepare? The entire dish takes about 30 minutes to prepare and cook.
  • Can I make this dish vegetarian? Yes, substitute chicken with sautéed mushrooms or tofu and use vegetable broth.
  • What can I serve with this dish? Green salads, steamed veggies, or crusty bread work wonderfully.
  • How do I know when the chicken is done? The internal temperature should reach 165°F (74°C).
  • Can I use other types of potatoes? Absolutely! Sweet potatoes also work beautifully in this recipe.
  • Is it good for meal prep? Yes, it reheats well and is great for lunch or dinner the next day.

Nutritional Tips and Dietary Adaptations

This dish can be made healthier or adapted for dietary needs:

  • Lower Fat Option: Use skinless chicken breasts instead of thighs for a leaner meal.
  • Gluten-Free: The recipe is naturally gluten-free; just ensure your chicken broth is certified.
  • Low-Carb: Substitute potatoes with cauliflower for a lower-carb version.

Essential Equipment for Success

To execute this recipe flawlessly, here are some kitchen tools you’ll want:

  • Large Skillet: A heavy-duty skillet, preferably cast iron or stainless steel, for even cooking.
  • Sharp Knife: For easily cutting chicken and potatoes.
  • Cutting Board: A sturdy board for prep work.
  • Meat Thermometer: To ensure your chicken is cooked to perfection.

Serving Suggestions

When it’s time to serve, think about adding some extra flair:

  • Serve with a Side Salad: A light green salad with vinaigrette can balance the richness of the dish.
  • Top with Fresh Herbs: A sprinkle of fresh parsley or basil enhances both flavor and presentation.
  • Accompany with Bread: Crusty baguette or garlic bread is perfect for mopping up the delicious sauce.

Conclusion

The quick garlic butter chicken and potatoes skillet is a straightforward yet delightful dish that encapsulates the essence of home-cooked comfort food. With its ease of preparation, rich flavors, and the ability to adapt to various tastes, it’s sure to become a family favorite. So gather your loved ones, set the table, and enjoy a meal that celebrates the simple joys of cooking and sharing together. Happy cooking!

Quick Garlic Butter Chicken & Potatoes Skillet Dinner

Prep Time 10 minutes
Cook Time 25 minutes
Total Time 35 minutes
Servings 4 servings
Calories 550
A flavorful and easy one-pan meal featuring tender chicken, crispy potatoes, and a fragrant garlic butter sauce.

Ingredients

Chicken

  • 2 lbs Boneless, Skinless Chicken Thighs (cut into 1.5-inch pieces)
  • 2 tbsp Olive Oil (divided)
  • 1 tsp Smoked Paprika
  • 0.5 tsp Dried Thyme
  • 0.5 tsp Garlic Powder
  • to taste Salt and Freshly Ground Black Pepper
  • 1.5 lbs Small Red or Yukon Gold Potatoes (cut into 1-inch pieces)
  • 0.5 tsp Onion Powder
  • 6 tbsp Unsalted Butter (divided)
  • 8-10 cloves Garlic (minced)
  • 0.25 cup Chicken Broth
  • 2 tbsp Fresh Lemon Juice
  • 0.25 cup Fresh Parsley (chopped)
  • 1 tsp Red Pepper Flakes (Optional)

Instructions 

  • Pat chicken dry and toss with 1 tbsp olive oil, paprika, thyme, garlic powder, salt, and pepper.
  • Toss potatoes with 1 tbsp olive oil, onion powder, salt, and pepper.
  • Cook potatoes in butter until golden and crispy, then transfer to a plate.
  • Cook chicken in butter until golden and cooked through, then set aside.
  • Sauté garlic and red pepper flakes in remaining butter, then deglaze with broth. Add lemon juice and simmer.
  • Return chicken and potatoes to skillet, toss with sauce, garnish with parsley, and serve.

Notes

Ensure chicken is cooked to an internal temperature of 165°F (74°C) for safety.
Calories: 550kcal
Cost: $15
Course: Main Course
Cuisine: American
Keyword: chicken, Garlic, Potatoes